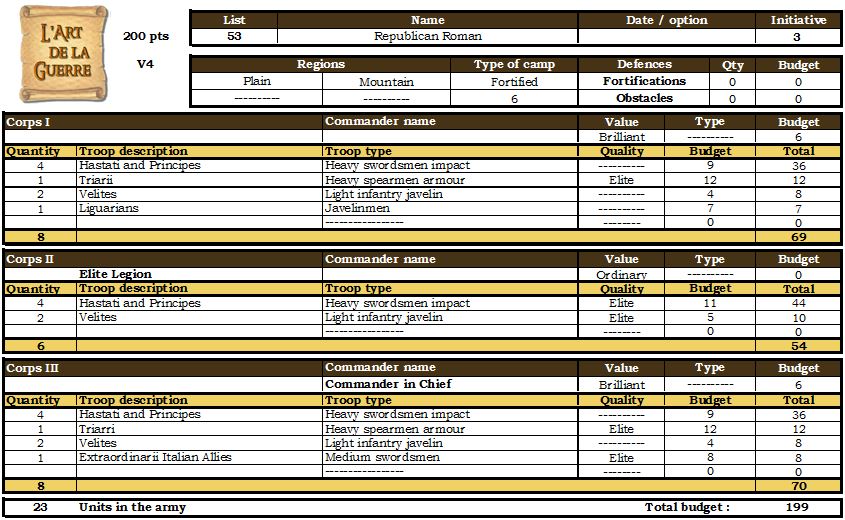
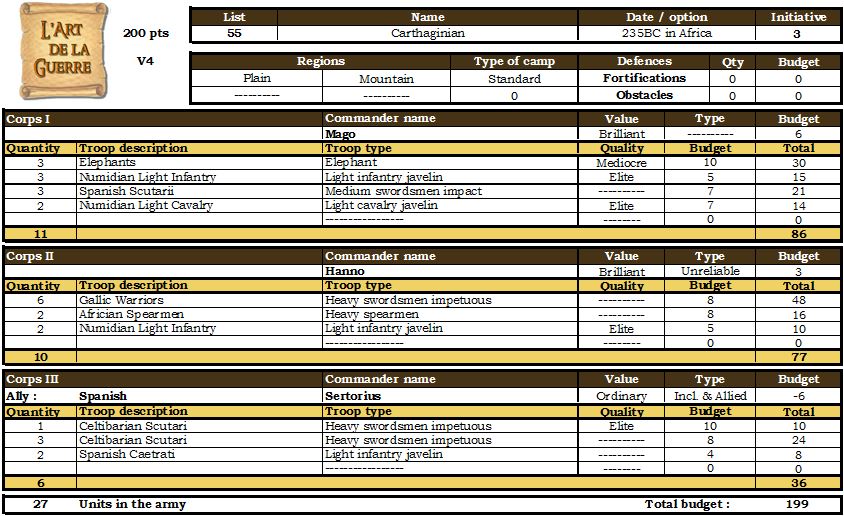
Republican Romans vs Carthaginians
Pregame
I was excited to play a historical matchup of Republican Romans vs Carthaginians.
My previous games using Romans, I had a dedicated cavalry corps. However in both games this corps was routed by the enemy cavalry corps, my corps being either outnumbered or outmatched. After my second game with Romans I had pondered if I should just get rid of all my cavalry and have a rough terrain command. Also subsequent to those games, I was coming off a couple of recent games with my Alexandrians where my Companion cavalry failed to live up to expectations. I decided against having a cavalry corps this time. The question was then whether to have a single cavalry unit per command (similar to Julian's suggested list), or to use some medium infantry.
I decided on two corps based on the historical mix for a legion, and a slightly smaller veteran legion corps. I also gave the historical corps a unit of medium infantry each, one with unit of elite medium swordsmen than could occupy terrain and the other with Javelinmen that I could use against elephants. The veteran corps would go in the centre to make sure that it got into combat.
I expected to be facing elephants, cavalry and impetuous swordsmen. My plan was to place terrain to hinder the cavalry and any African spearmen. Elephants are not penalised in fields or brush so I needed to be careful there.
Army lists
My Republican Roman list
Phillip's Carthaginian list was
The Game
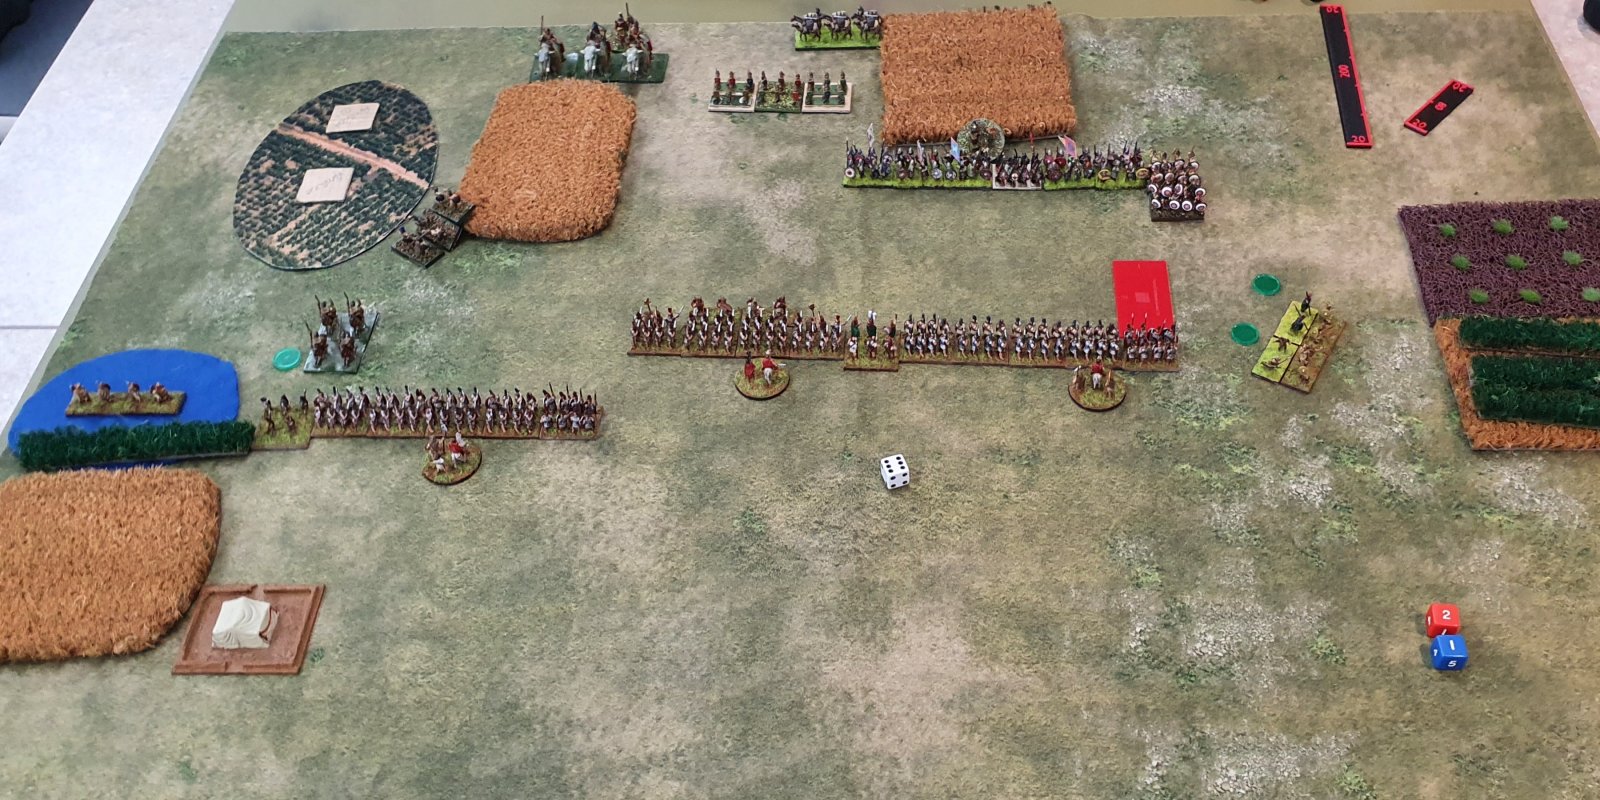
Philip won initative and decided to attack in the plains. I was unsuccessful in rolling for a coastal zone. In addition to the compulsory field, I took a marsh, a plantation, and a hill with a plantation on it. Phillip took two fields and a plantation. During the terrain adjustment phase, Phillip was unsuccessful in moving anything and I successfully moved the field in his deployment zone up to his baseline and slightly to one side.
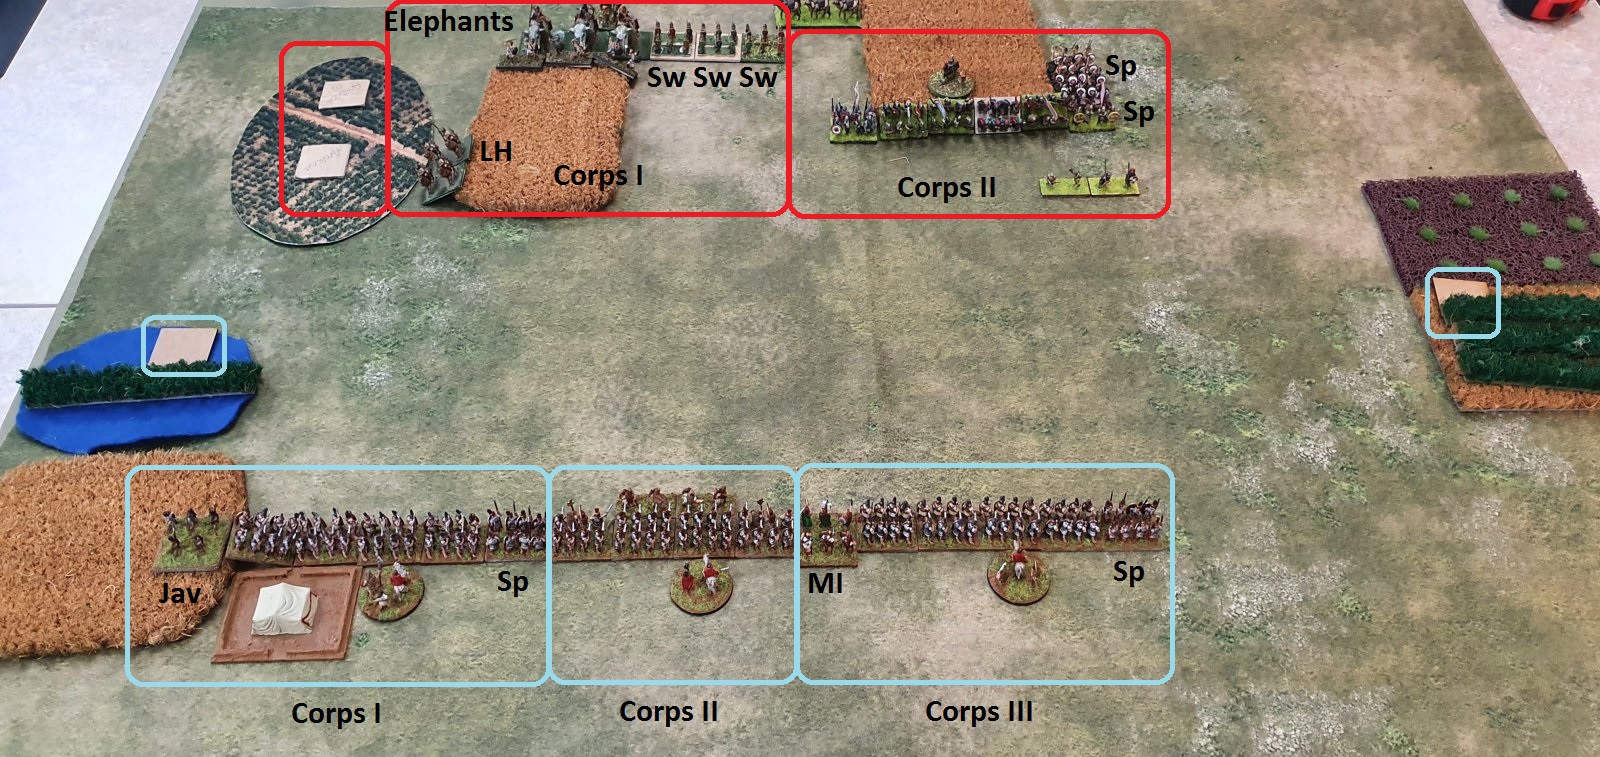
Initial deployment
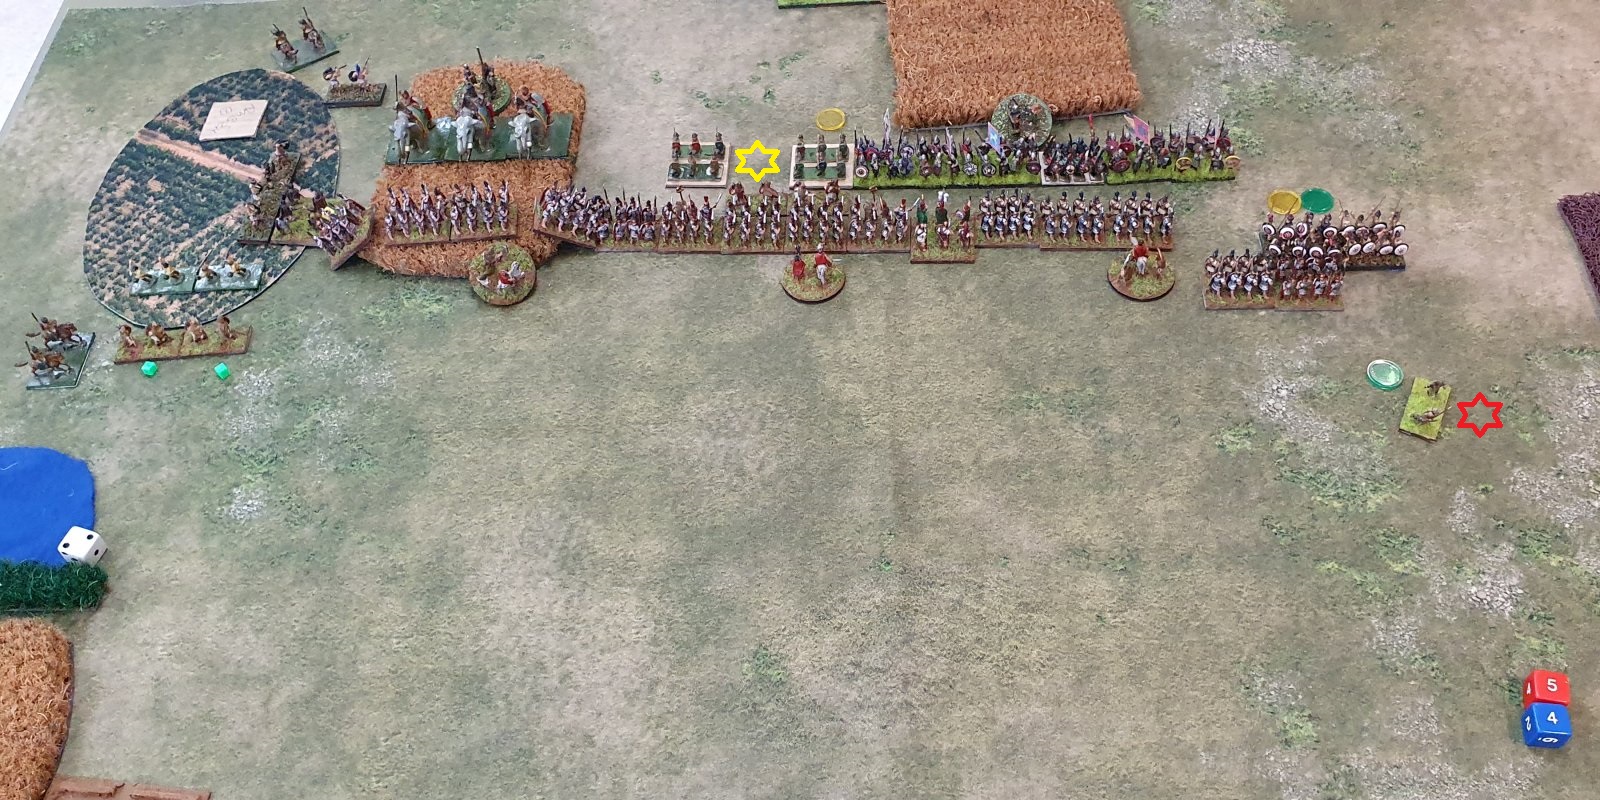
When determining my deployment plan, I decided to place 2 Velites (LI Jav) in each ambush. My thinking was that they would project a threat area to enemy elephants. Given my intent to butt up against the terrain on the left flank, having units in ambush on the terrain in the left flank made sense as they would be able to work with the rest of my army. Having troops in the right hand ambush makes less sense in retrospect.
When Phillip only deployed two corps, my guess was that the third corps was a cavalry command. Having it in a plantation seemed unlikely, so I was guessing a flank march. My plan was to move forward as quickly as possible and try to defeat his two corps on the table before the flank march could come on.

End of Carthaginian Turn One
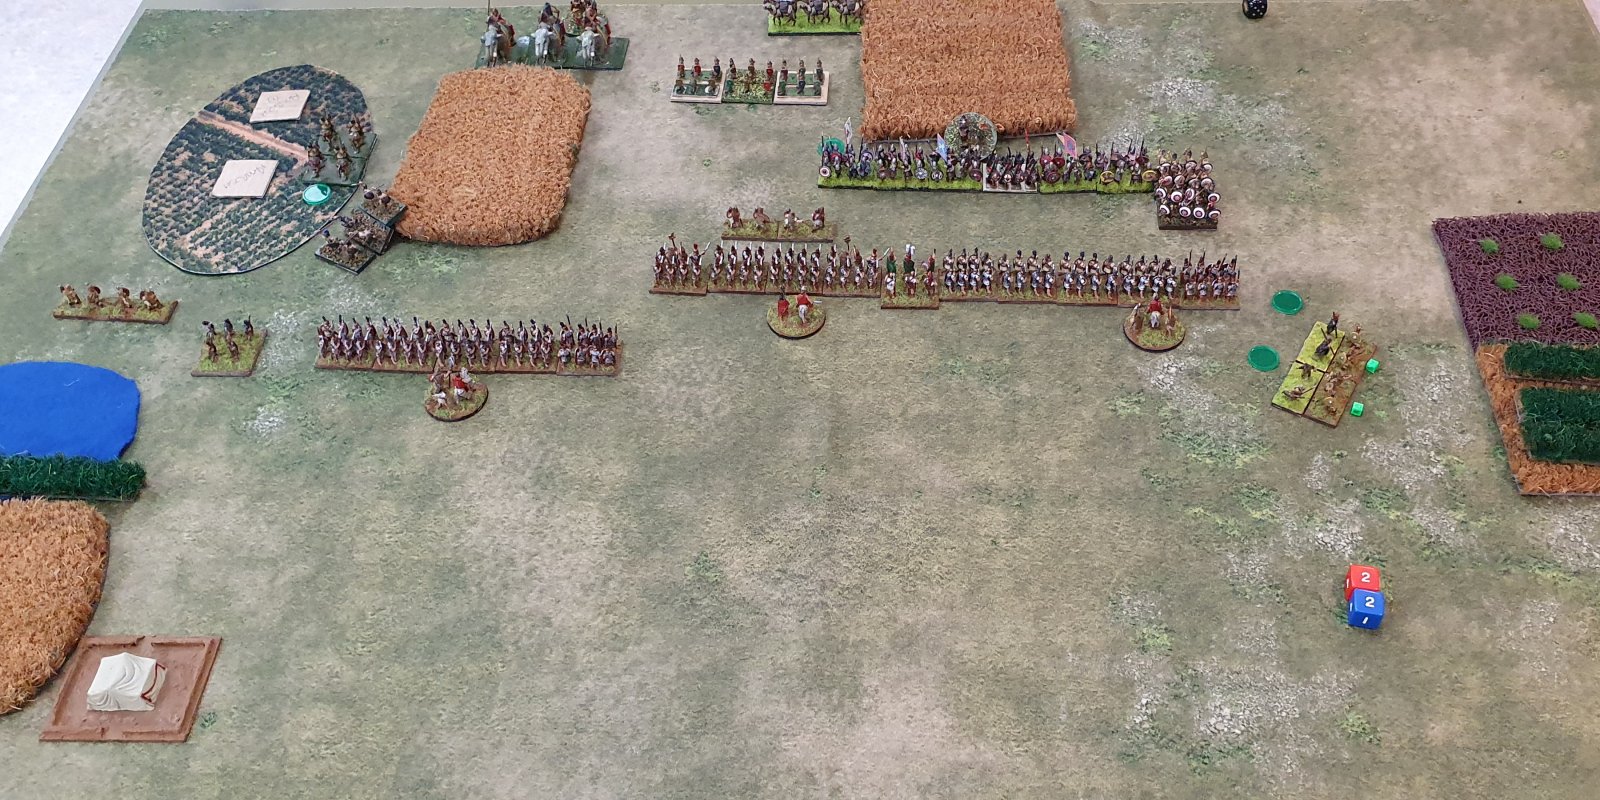
Carthaginian turn one, Phillip didn't roll for a flank march. This meant it had to be an ambush on his right flank.
His centre command moved up his Numidian light horse to investigate my ambush in the marsh, and the two Roman Velites LI were revealed. He also moved up his LI towards his light horse. There would have been some shooting between my LI and the light horse, but no hits were taken on either side.
The Carthaginian command on his left moved the battle line out of the field, and moved his light infantry towards my other ambush in the plantations.
End of Roman Turn One
On my right flank I brought the light infantry out of the ambush to prevent the Carthaginian LI from getting behind my battle line, and moved up my legion two moves. In the centre my veteran legion moved up to align.
On my left flank I moved my LI further back into the marsh, and moved forward the legion as far as I could. The presence of the enemy within 4UD stopped me from having a second move, and I didn't want to split up the legion at this stage.
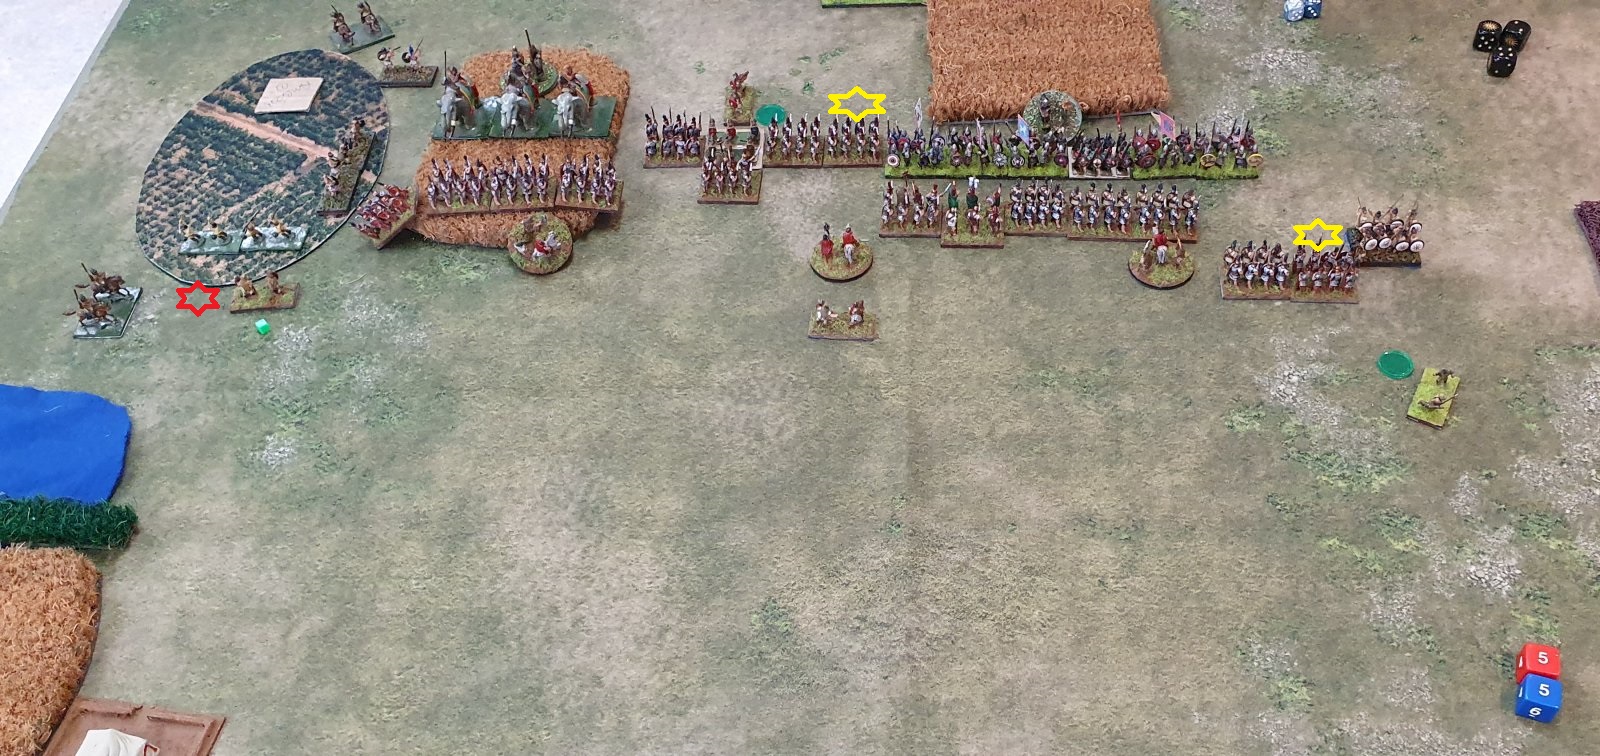
End of Carthaginian Turn Two
On the Carthaginian right flank the Numidian light horse moved to ZoC my infantry, and their light infantry moved up further. In the exchange of javelins, the Javelinmen did one hit on the light horse. On their left flank, the Carthaginian light infantry charged my Velites light infantry. However both Carthaginian units lost their combats despite being elite. In the Carthaginian main battle line, the spearmen in column moved forward so the rear unit was aligned with the Gallic warriors.
End of Roman Turn Two
In my turn two I moved up my main battle line towards the Gauls. My skirmishers inflicted one hit from shooting.
On the left flank the Javelinmen charged the Numidian light horse, who evaded. I moved up my light infantry to support, and moved up my left hand legion to be able to support the main battle line. In the skirmisher melee on my right flank, both my units lost.
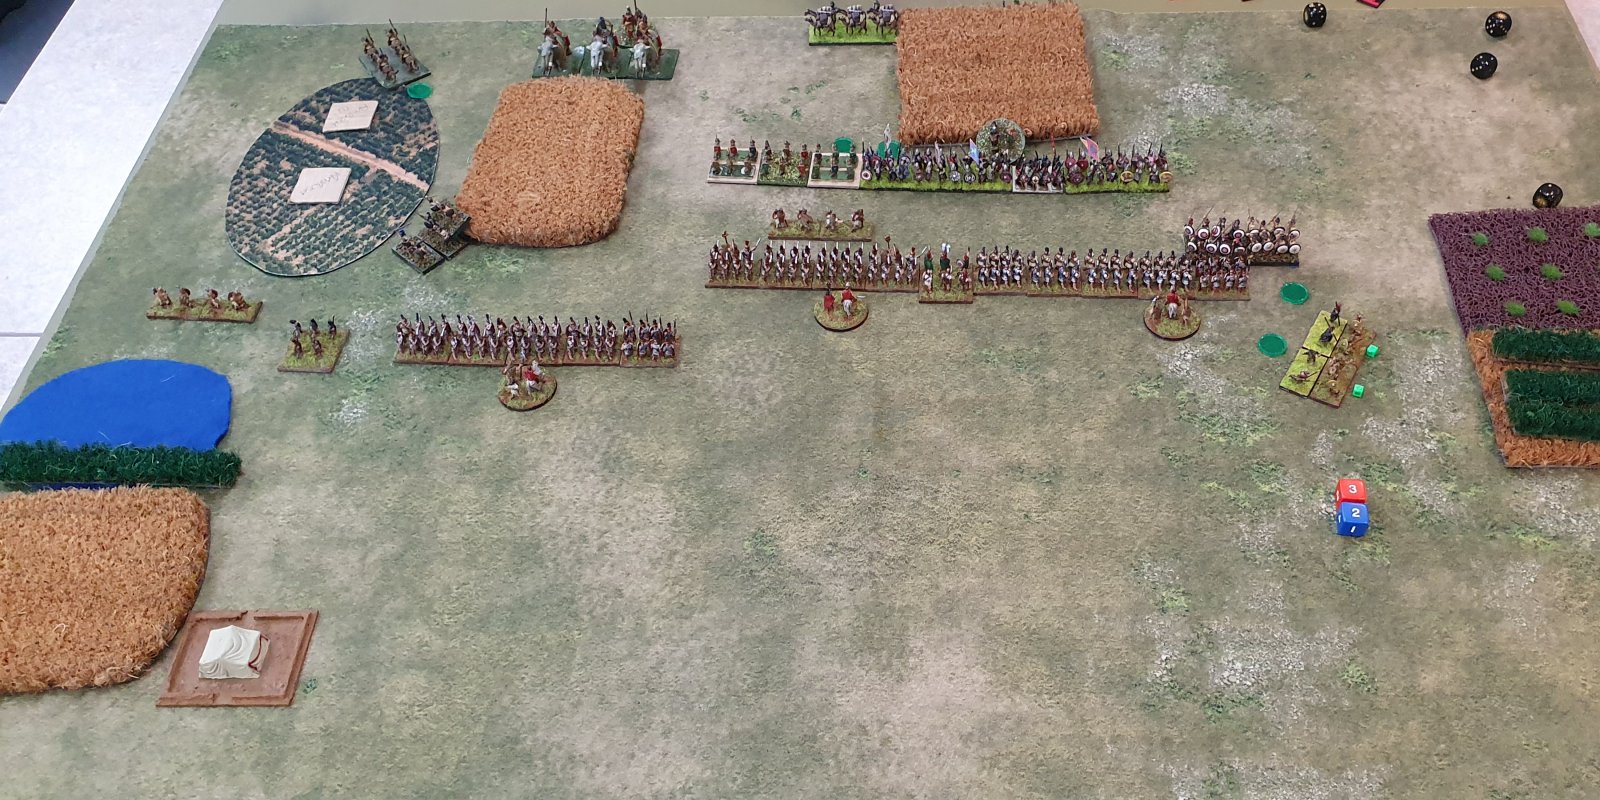
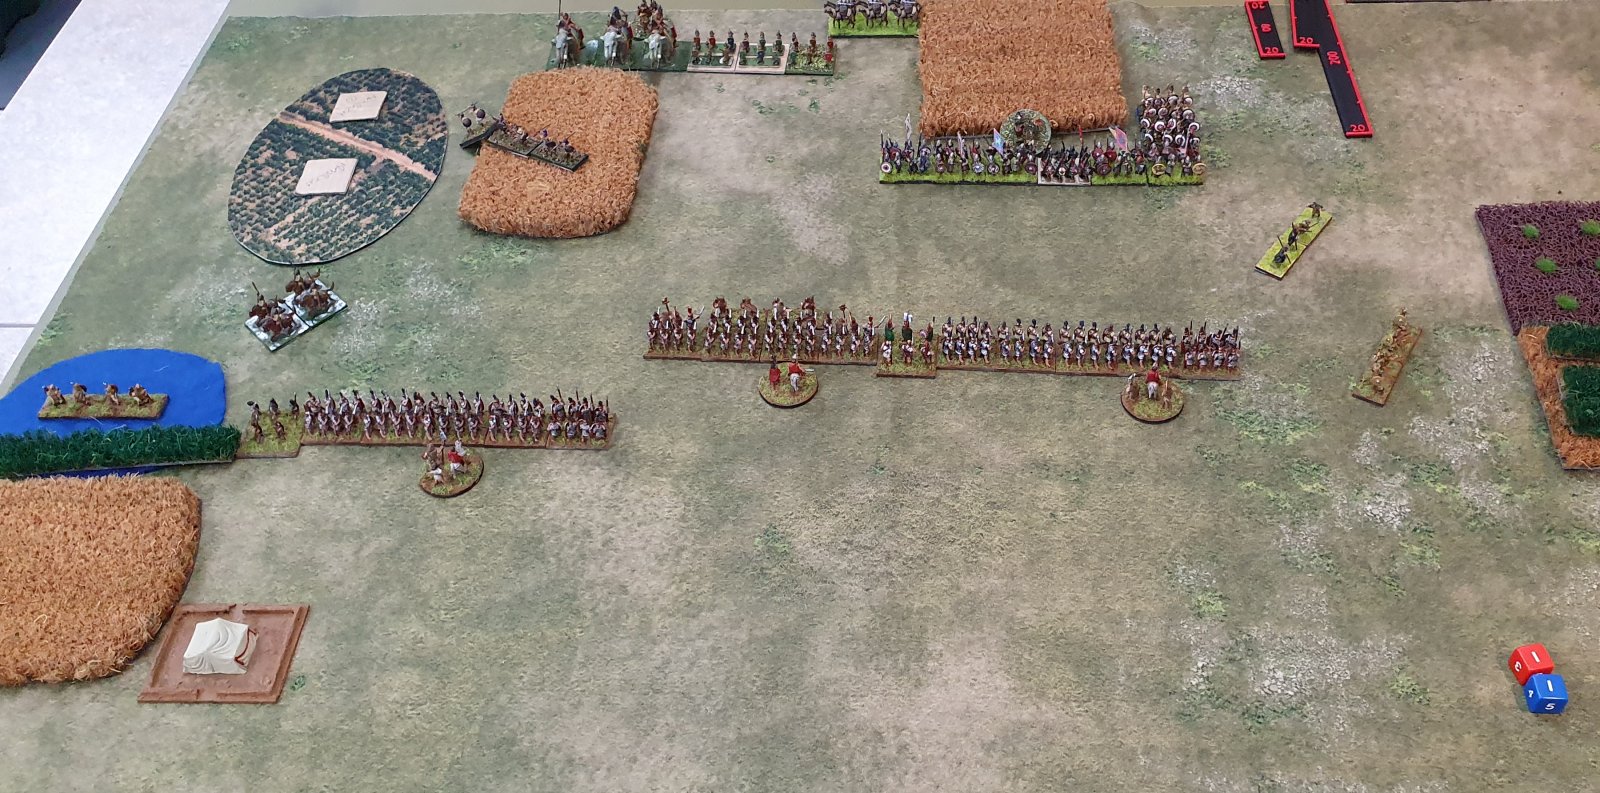
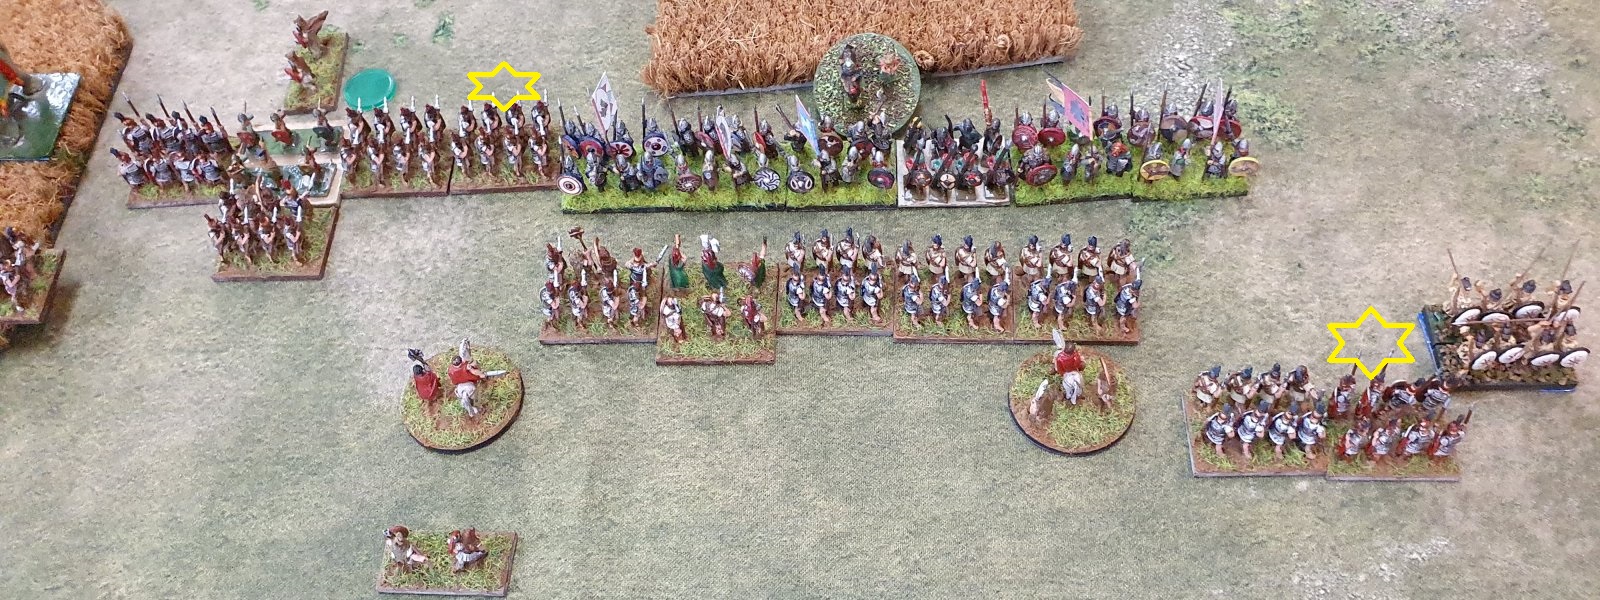
End of Carthaginian Turn Three
In turn three, the Carthaginian Numidian light horse moved back behind the hill. The Spanish MI moved up to extend the Gallic battle line. The two African spearmen units moved up to engage the Triarii end of my battle line with an overlap. My skirmishers did a shooting hit on the Spanish MI. In the battle of the skirmishers it must have been a draw. The battle of the spearmen may have been a draw, or perhaps the Triarii lost and were saved by their armour.

End of Roman Turn Three
In my turn three, I moved up my main battle line to ZoC the impact Spanish and impetuous Gallic warriors in the Carthaginian battle line. However I left one unit of legionaries behind in support of the Triarii unit in combat. I left this supporting unit in position as if I had moved forward to enable a flank charge the following turn, it would not be a valid flank charge because it would need to conform into the ZoC of the end unit of Gallic warriors. My central skirmishers between the battle lines continued to inflict hits from shooting. I think the Triarii lost their combat but their armour saved them from taking any hits.

Detail of Roman Turn Three
In the skirmisher melee on the right flank I lost a unit but drew the other combat.
On the left flank my skirmishers moved forward to expose the ambush, which consisted of two units of light infantry. My Javelinmen charged the LI which had to evade. My left legion moved up to support the main battle line. It stopped about 1cm short of the field.
With the legion on my left flank, I could have split it up to just move the Triarii up to support my battle line, and kept the rest of the legion further back from the terrain. I only needed one extra unit one the battle line to get the overlap. However I was already operating my light infantry, Javelinmen and legion as three separate groups and I was worried about having enough command points if I split the legion further.
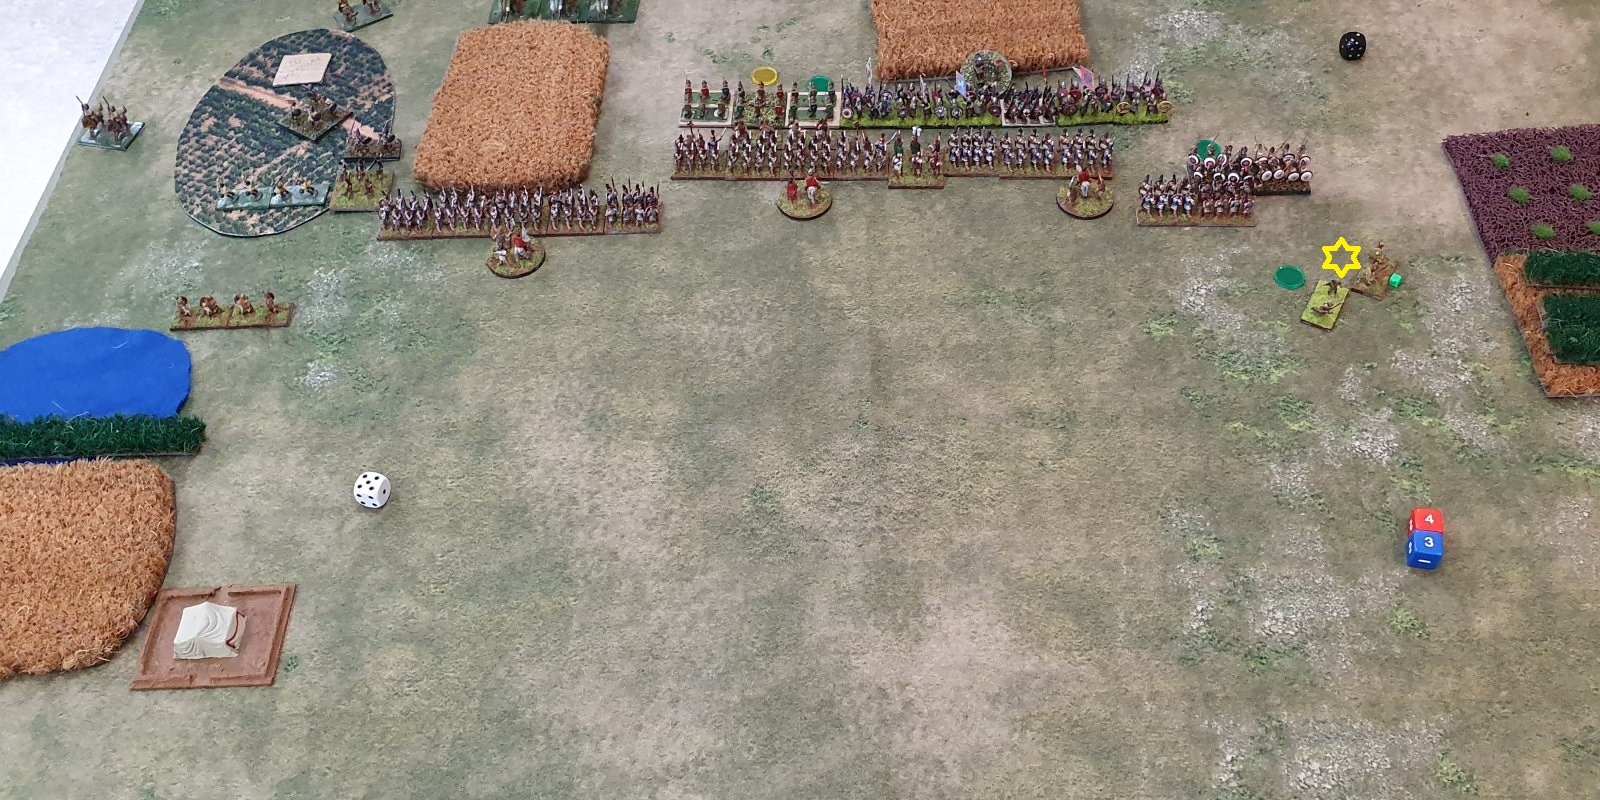
End of Carthaginian Turn Four
In turn four, the Numidian light horse was moving around the hill back towards the battle. The light infantry was also moving up to threaten my Javelinmen. We may have played that they ZOCed the Javelinmen, however if we did this would have been incorrect as the LI were not entirely in terrain. We were also unsure about the effect of cover on shooting when the two units are partially in terrain. The Javelinmen should have been penalised shooting as they were partially in cover, the LI should not have been. Both units would have the protection of cover as the line of sight to them would go through cover.
In the main battle Phillip was able to restrain the impetuous Gauls, but this meant that he didn't have the command points to do anything else except rally off one point of shooting. My skirmishers did another hit on the MI. In the combats the Triarii did a hit on the African spearmen, and my skirmishers routed their opponents.
End of Carthaginian Turn Five
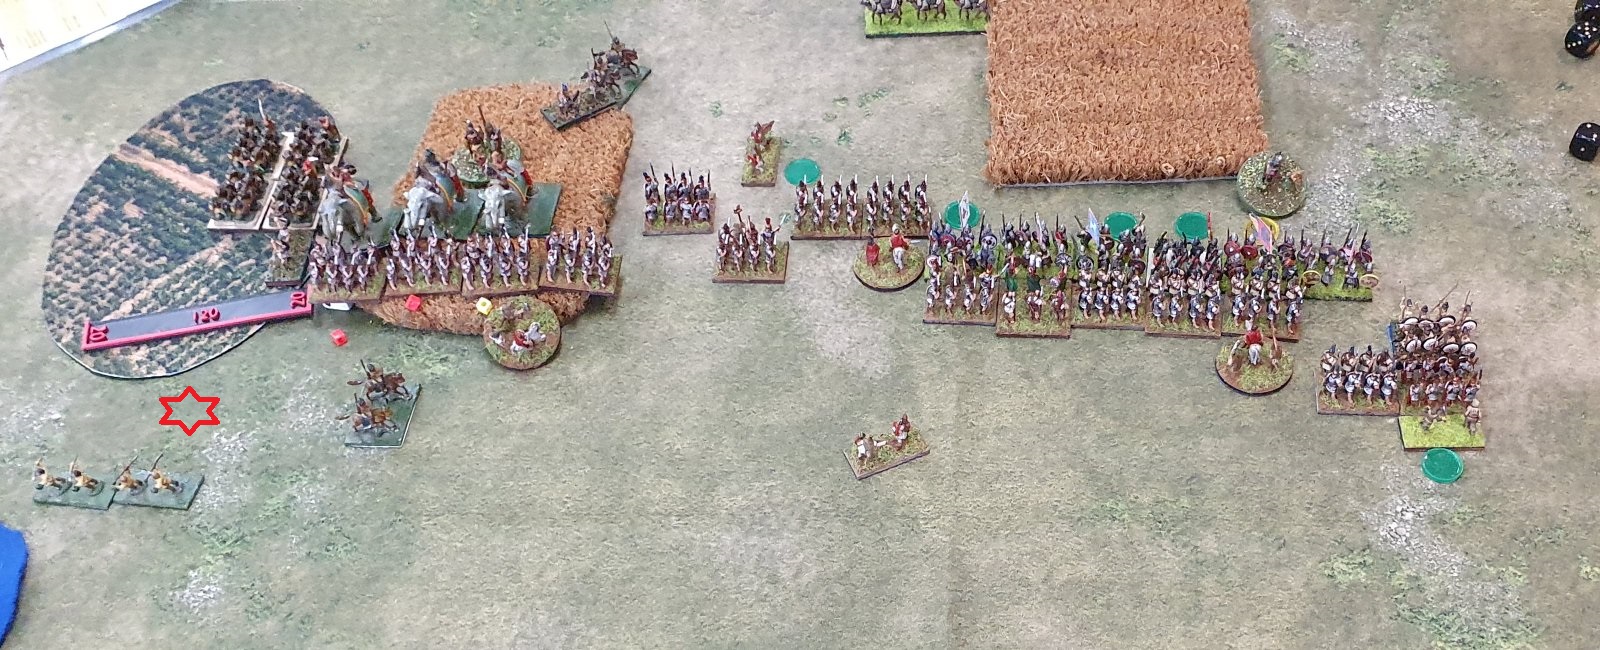
I forgot to take pictures for the Roman turn four. Between the two shooting phases (my turn four and Phillip's turn five), my skirmishers routed a unit of medium infantry and did another hit on a second unit. Also in the skirmisher melee my unit had conformed into combat and was destroyed. The interesting or scary stuff all took place on my left flank.
I had moved up my light infantry to just out of the terrain and was having a shooting exchange. However the Numidian light horse had come around to threaten the unit. I think that I must have charged the LI that was in front of my Javelinmen. This left me open to a flank charge from the other LI. In retrospect I may have been better having a refused flank and moving both the LI and the Javelinmen back.
My biggest mistake though was moving my heavy infantry into the fields. This penalises them in combat, but elephants are not penalised by fields. I should have just moved up the Triarii to join the main battle line and left the heavy infantry back. I really don't know what I was thinking.
In their turn five, the Carthaginian elephants have moved up into the fields and are threatening my line. I don't think that they were ZOCing me, but been just more than 1 UD away.
Not visible in the photo, but the Javelinmen have taken a couple of hits. If they rout, they will inflict a hit on the end unit of legionaries.
End of Roman Turn Five
Close up of Roman Turn Five
On the left flank, I was worried about the Javelinmen breaking. I
had three options
1. Leave my legionary line intact and take a hit from friends routing
through when the Javelinmen routed.
2. Advance the legionaries enough to contract the left hand unit behind.
I would then be ZOCed by the elephants, but would not ZoC them.
3. Turn the unit around and move out of the area of 1 UD behind the
Javelinmen.
I went with option 3. None of the options were good choices.
In the centre (which I must have moved before the left flank), I charged with 3 legionaries into the Spanish medium infantry. I also moved up the Triarii from the left command alongside the end MI unit to provide support. The right hand MI unit was routed but the left hand unit only took 1 hit despite me being elite and up by two.
I also moved the LI unit up before the charge through the gap between the two MI units. After the game we realised that this is not a valid move, the LI could only have done this if both MI were engaged in combat. This would have required me to charge separately with the left and right legionary units, then move the light infantry through the gap, then move up the central legionary unit up for support. All of that would have required 3 command points for the charge, plus another to move the light infantry. Not likely with an ordinary general.
I didn't charge the rest of my battle line into the Gauls as the impetuous Gauls would then have impact and also my end unit would be fighting at a disadvantage.
In the combat on the right, the Triarii finally dispatched its African spearmen opponents. The combination of veteran and armour have won over several turns.
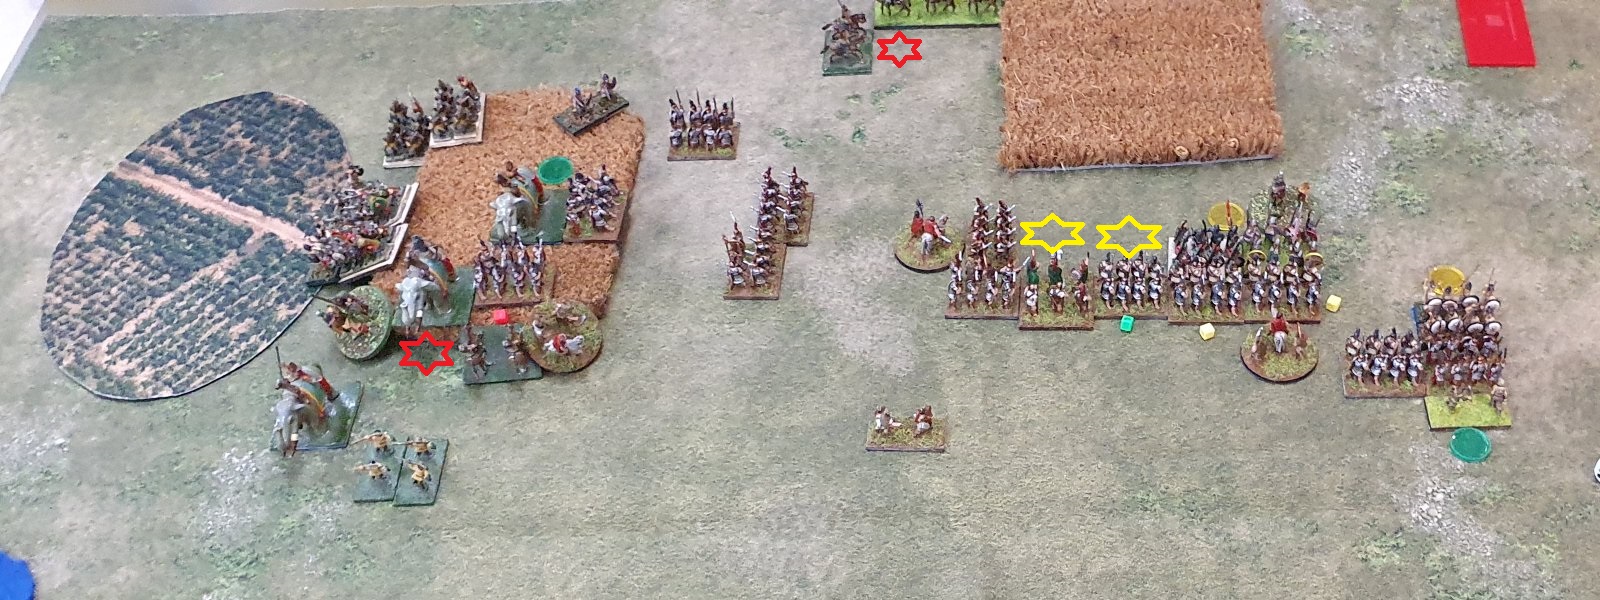
End of Carthaginian Turn Six
I think the above photo is turn six, but it may have been turn seven.
The remaining Carthaginian ambush has been revealed, and it contained 4 Spanish HI as an allied core. The elephants have charged my legionaries and inflicted 3 hits, 3 hits and two hits. The Gauls have charged into the legionaries, but are coming off worse. The remaining African spearmen have conformed on my Triarii and are being supported by the light infantry.
The Numidian light horse have charged the light infantry in the flank, routing them, and then done a pursuit move.

End of Roman Turn Six
My light foot have moved up and looted the Carthaginian camp. I have charged one of the Gallic warrior units in the flank and routed it, and also routed another unit at the far end. One unit of legionaries has moved up to simple support on the flank of the elephant, and a unit of Triarii has moved up hold off the light horse and protect the light infantry looting the camp.
End of game
We thought that the game ended up in the Carthaginian turn 9, though the photo log suggests it may have been turn 8. The cohesion losses in the last four turns were:
Carthaginian 7 - Roman 7: Carthaginian cohesion losses 22/27, Roman 16/23
Carthaginian 8 - Roman 7: Carthaginian cohesion losses 22/27, Roman 19/23
Carthaginian 8 - Roman 8: Carthaginian cohesion losses 26/27, Roman 21/23
Carthaginian 9 - Roman 8: Carthaginian cohesion losses 26/27, Roman 23/23
An exciting and close fought game.
Lessons learnt
There were a few rules that I need to remember
- ZoC - Light infantry completely in rough or difficult terrain exert a ZoC against all enemy units that are at least partially in rough or difficult terrain. (p38)
- Cover - A unit, except light infantry, is penalised when shooting if part of its shooting edge is inside terrain that gives cover (p70)
- Sliding along the enemy (p41)
When I was unsuccessful in getting a coastal zone I experimented with using my fortified camp to protect a flank. However that would only have worked if I was planning on staying near it. Phillip suggested that I could have used a village. I will have to read up on the rules for villages and create some terrain for it.
Having the light infantry in ambush on my left flank to work with my battle line worked well. Having the 2nd ambush with light infantry well away from my battle line worked less well. It would probably have been better to have them working with the heavy infantry. They could then have whittled down the Gallic infantry.
Phillip having an entire corps in ambush was interesting. He could have tried to bluff by rolling a die each turn, which could have been command pips or for the flank march to come on. I didn't try to work out the missing points, so I had no idea how large the corps would be or what would be in it. In the end the heavy infantry didn't really get into the game. (Note that we checked and found that Iberian allies are only a subset of Spanish, and should have been medium infantry).
My moving up heavy infantry close to and then into terrain was a foolish mistake that I have hopefully learned from. I could see the elephants and there was a threat of something else. I should have stayed back and just been a threat to anything trying to attack the flank of my main battle line. I think that I would need to be more than 1 UD out of the plantation on the hill, otherwise his LI could just sit in terrain and shoot javelins at me.
The main battle line worked out well for me. Having the skirmishers rout a unit and disorder another was them working out exactly as I wanted. Phillip was faced with either holding back his impetuous units and taking shooting, or charging in and losing impact against my swordsmen.
In terms of my army composition it worked quite well. Arguably I could have had both the MI and Javelinmen in the same corps to have a dedicated rough terrain force. I didn't feel the lack of cavalry, although perhaps I should have left MI and Javelinmen back behind my main battle line as a reserve. If I am keeping a unit back in each corps as a reserve, I could still consider MC as being faster than MI. However MI has the option of fighting in the battle line and is terrain capable.
The other point of interest in this game is that it the first time that I felt I could have used more light infantry. I had six, which should have been plenty as I normally run between four and seven. Perhaps having them in the ambushes meant I didn't have enough skirmishing in front of my troops.
Phillip's Comments
[The Carthaginians kept their Spanish infantry in ambush until turn six]
It was a bit of a quandary with them - if you hadn't moved closer to the elephants into the fields I'd have probably brought them out sooner but the idea was they would appear on your flank or as close as possible and have you between the elephants and the ambush. Didn't quite work out that way though.