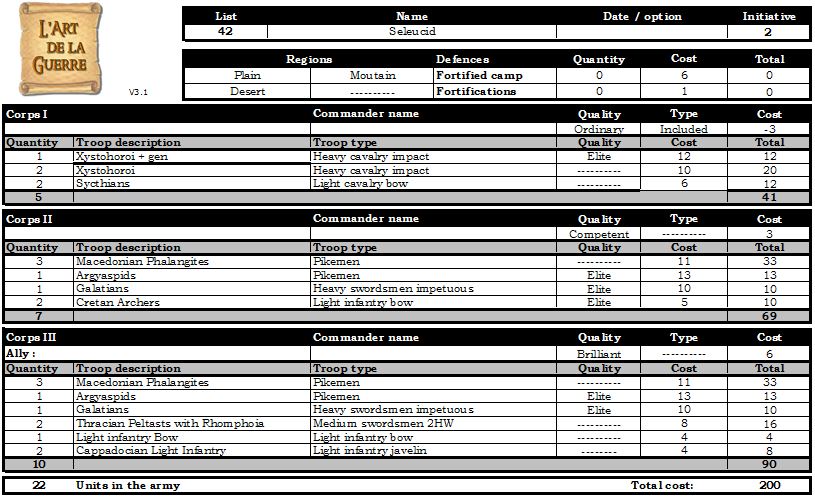
This game was organised ahead of time with Kevan as a historical matchup between Republican Romans vs a Successor army. I was expecting to face any three of Pikes, more Pikes, Elephants and Impact Heavy Cavalry.
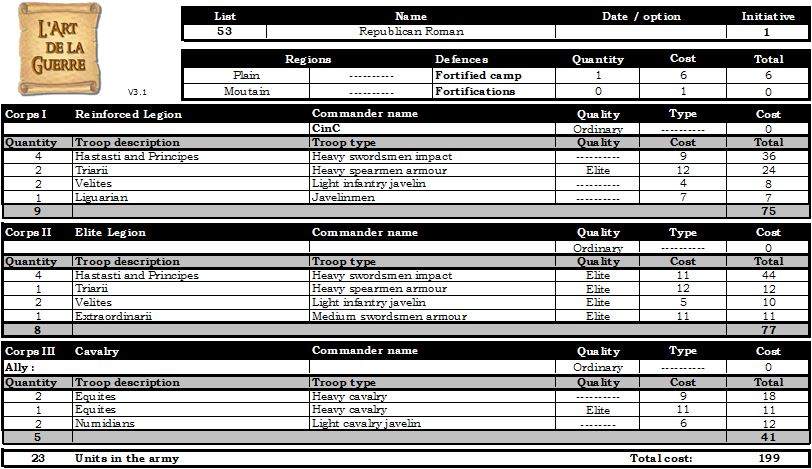
Reviewing my previous Republican Roman list, I did only a couple of small tweaks. I made one MI swordsmen armoured and elite, changed another to Javelinmen in case of elephants, and replaced the third with Triarii to help with Impact Heavy Cavalry. To pay for this I had to drop all my generals down to Ordinary.
My plan was that lots of terrain would hinder Kevan more than me. As such I would try and put the maximum amount of terrain on the board use my infantry either anchored on or in the terrain. I expected that my cavalry would be overmatched, but that hopefully it would hold on long enough to prevent flank attacks whilst my infantry won their battles.
My Republican Roman list
Kevan won imitative and decided to attack in the plains. In addition to the compulsory field, I took two plantations, a hill with a plantation, and a field. Kevan took a coastal zone and a field. I could not adjust any of the terrain as I had used all four pieces. Kevan was able to rotate the hill to make it less intrusive for him.

Final terrain placement
Whoops. I should have made sure that I left room between the two plantations for my camp.

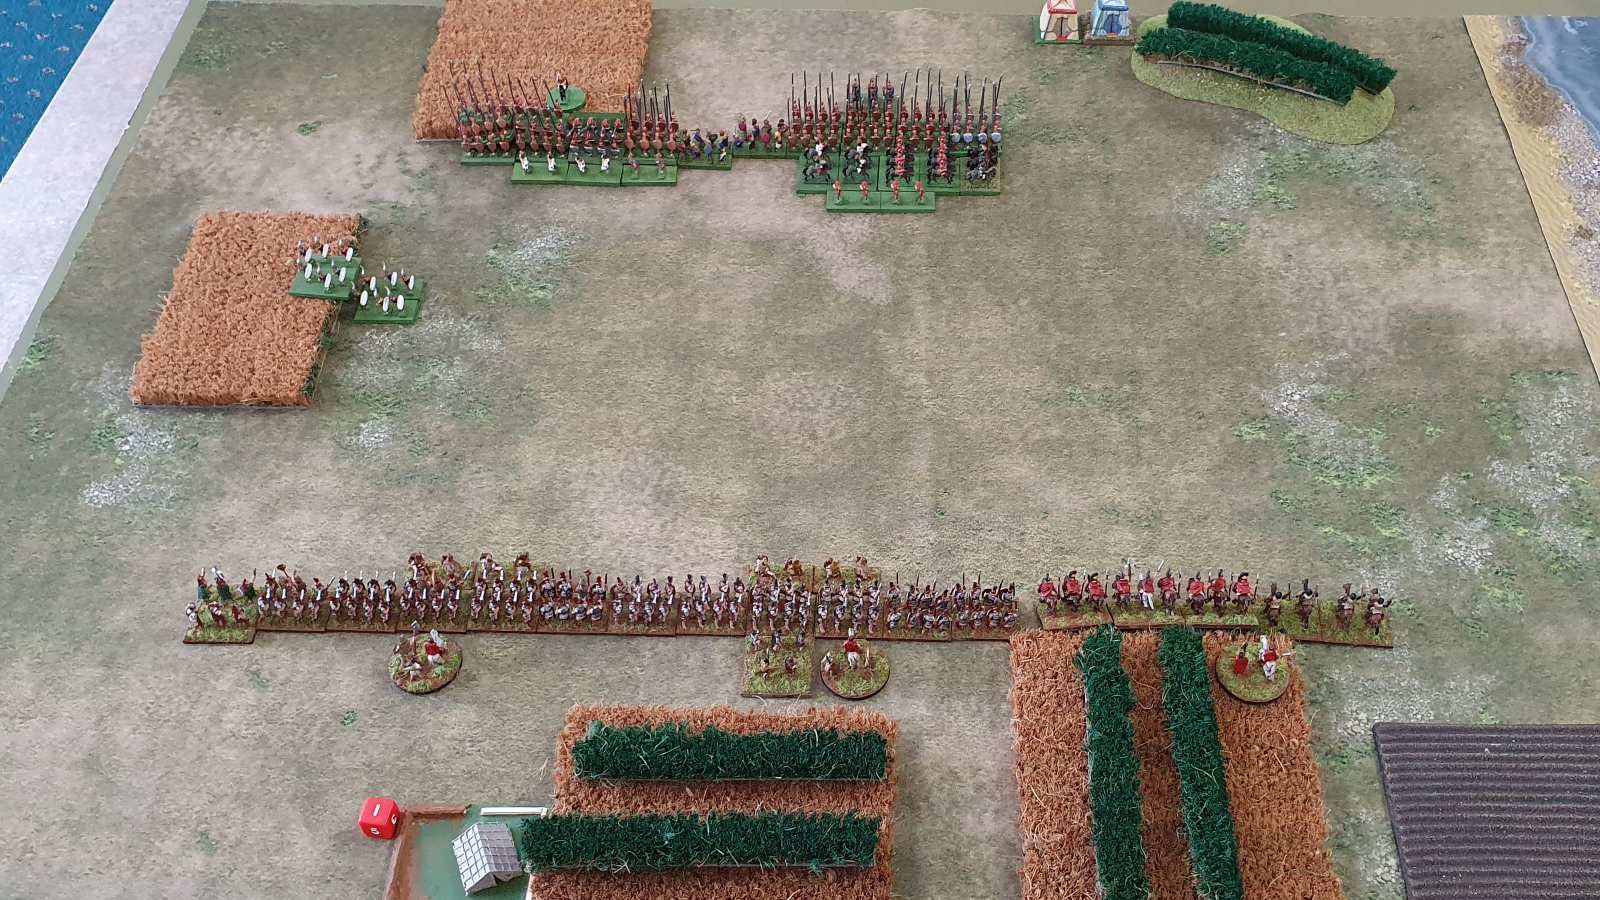
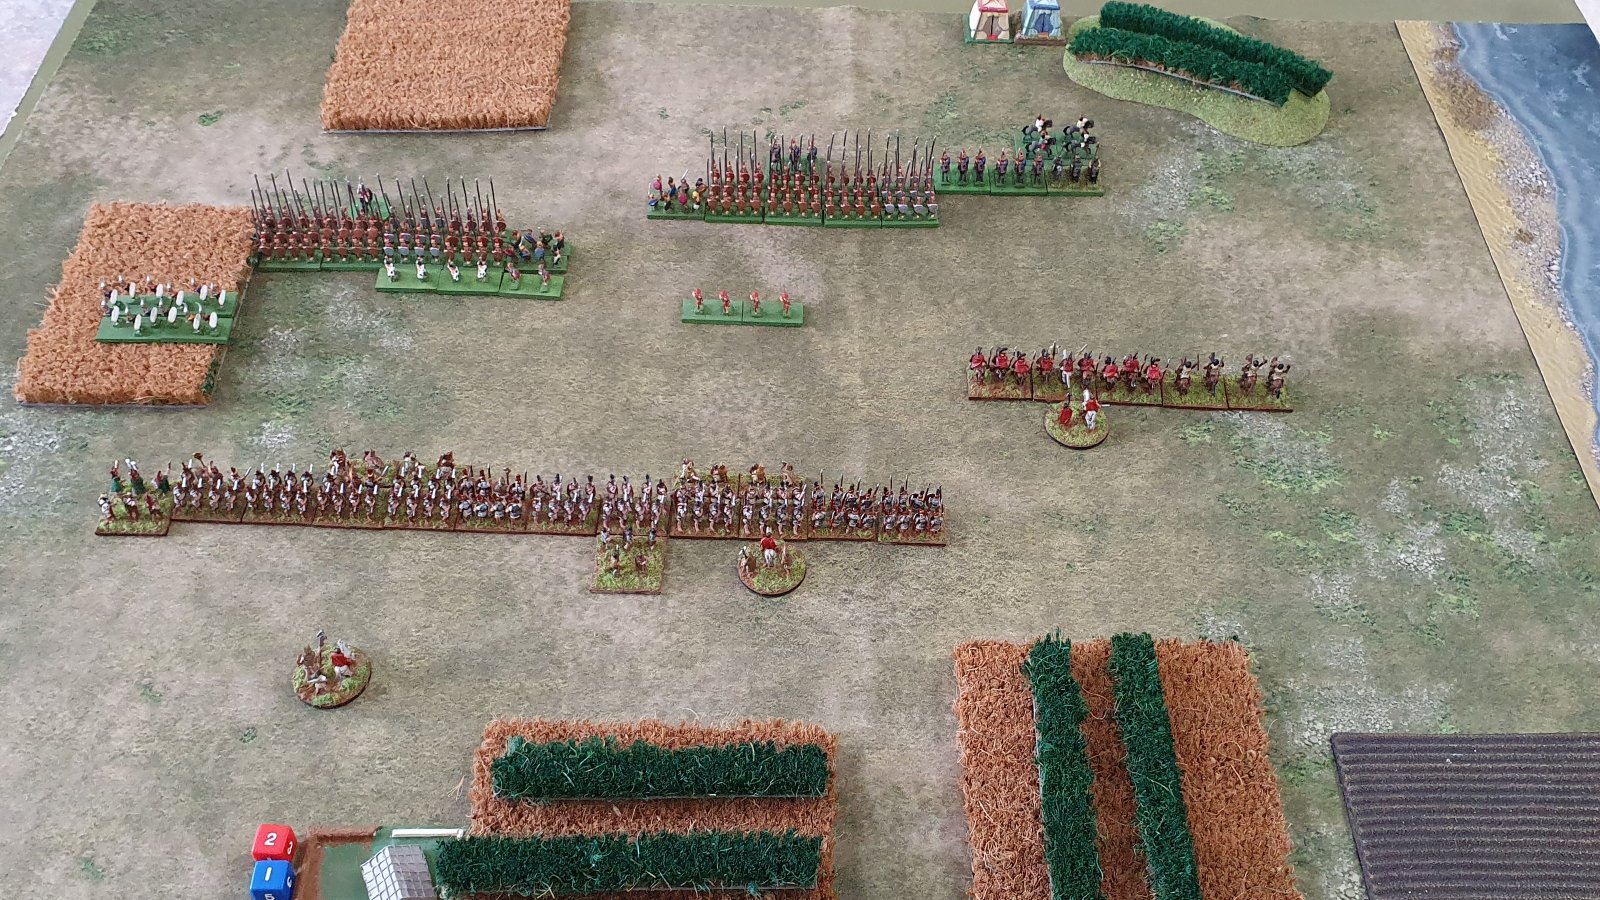
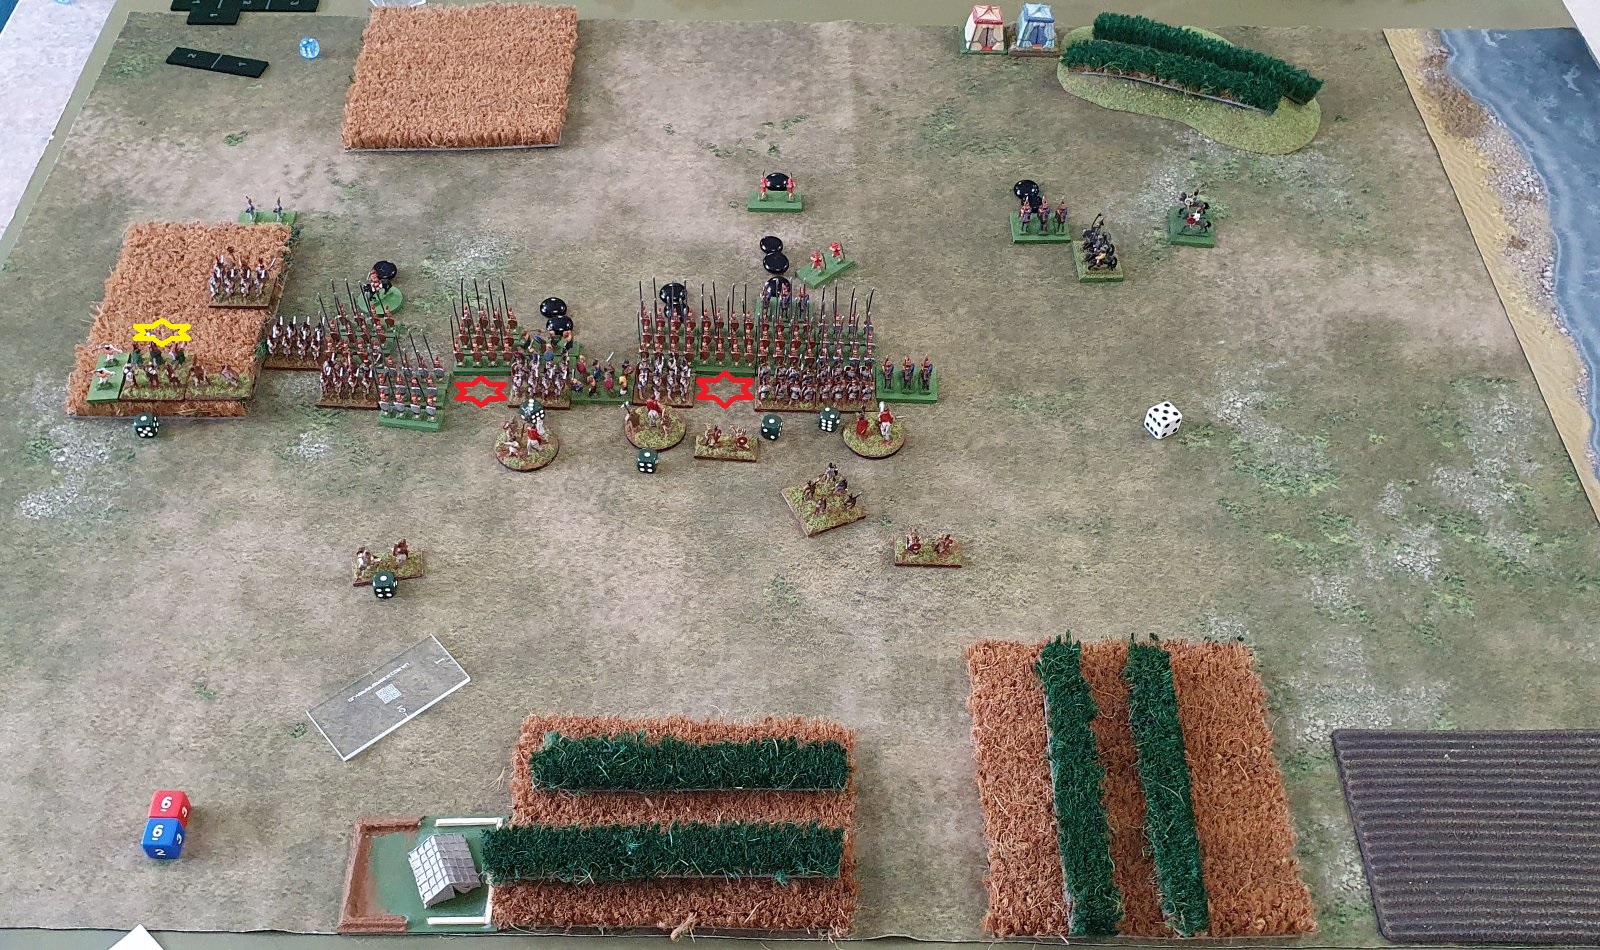
Initial deployment
I was planning to have my Elite Legion operate on the edge of the terrain, so I decided to have my cavalry on my right flank and this was the first unit I put down. Kevan responded with his Corps II. My second unit was the reinforced legion, with the two units of Triarii on the right flank to protect from his cavalry. Kevin responded with his Corps III. Note that the Galatians impetuous elite HI swords from the two Seleucid corps were adjacent to each other. Finally I placed my elite legion with the Triarii on the right flank to avoid the terrain. Kevan's final drop was to deploy his cavalry in column.
Things were looking interesting. Kevan could bring his cavalry down my flank which would cause problems. If I moved forward to the terrain he could get behind my battle line. I would have to angle my battle line diagonally across the board to deal with that. However it would mean my cavalry would have free range on his left flank.
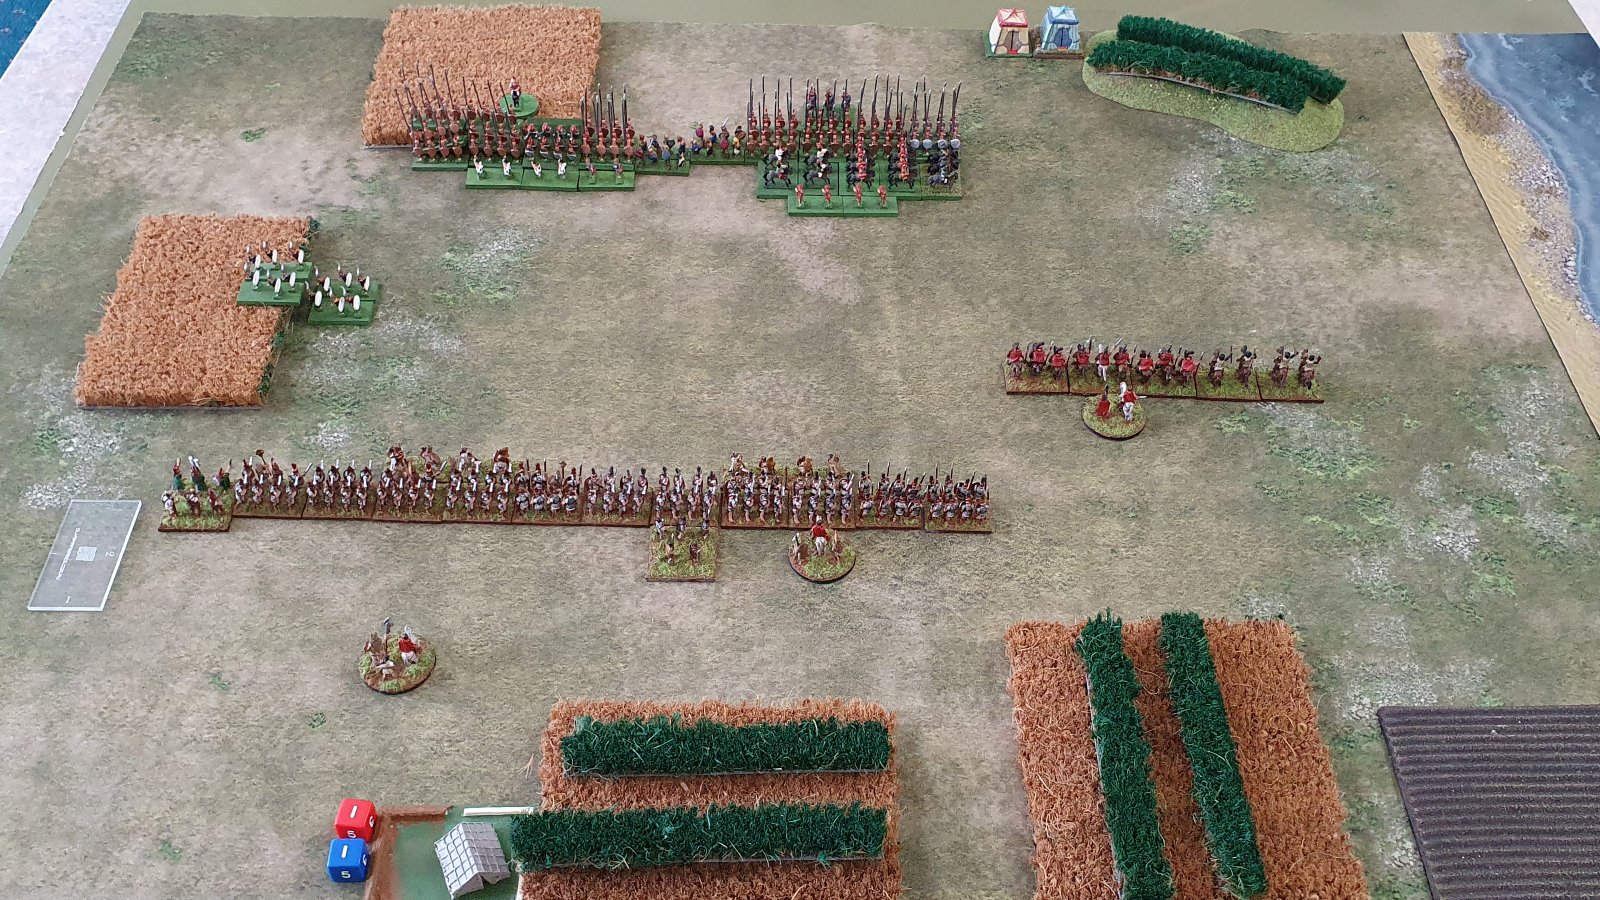
End of Seleucid Turn One
The Seleucids cavalry did a triple move across the front of their lines to reposition from their right flank to their left flank. The Thracians did a double move into the field on my left flank, and his main battle line moved as far as it could. Note that his Corps II couldn't move the full 2UD because of his cavalry in front of it.
End of Roman Turn One
I did a double move of my two infantry commands to move my battle line about 3UD and end up at 4UD from the Thracians in the field. My cavalry also did a double move to get as far forward as they could to have maximum room to evade.
On the Seleucid right flank the Thracians moved further into the field, and the rest of that Corps did a double move. The cavalry formed into a battle line with the LH behind, and the central command did a single move.
I am feeling quite good at the moment. The Seleucid cavalry has taken two turns to get into position, and the Seleucid battle line is somewhat disjointed.

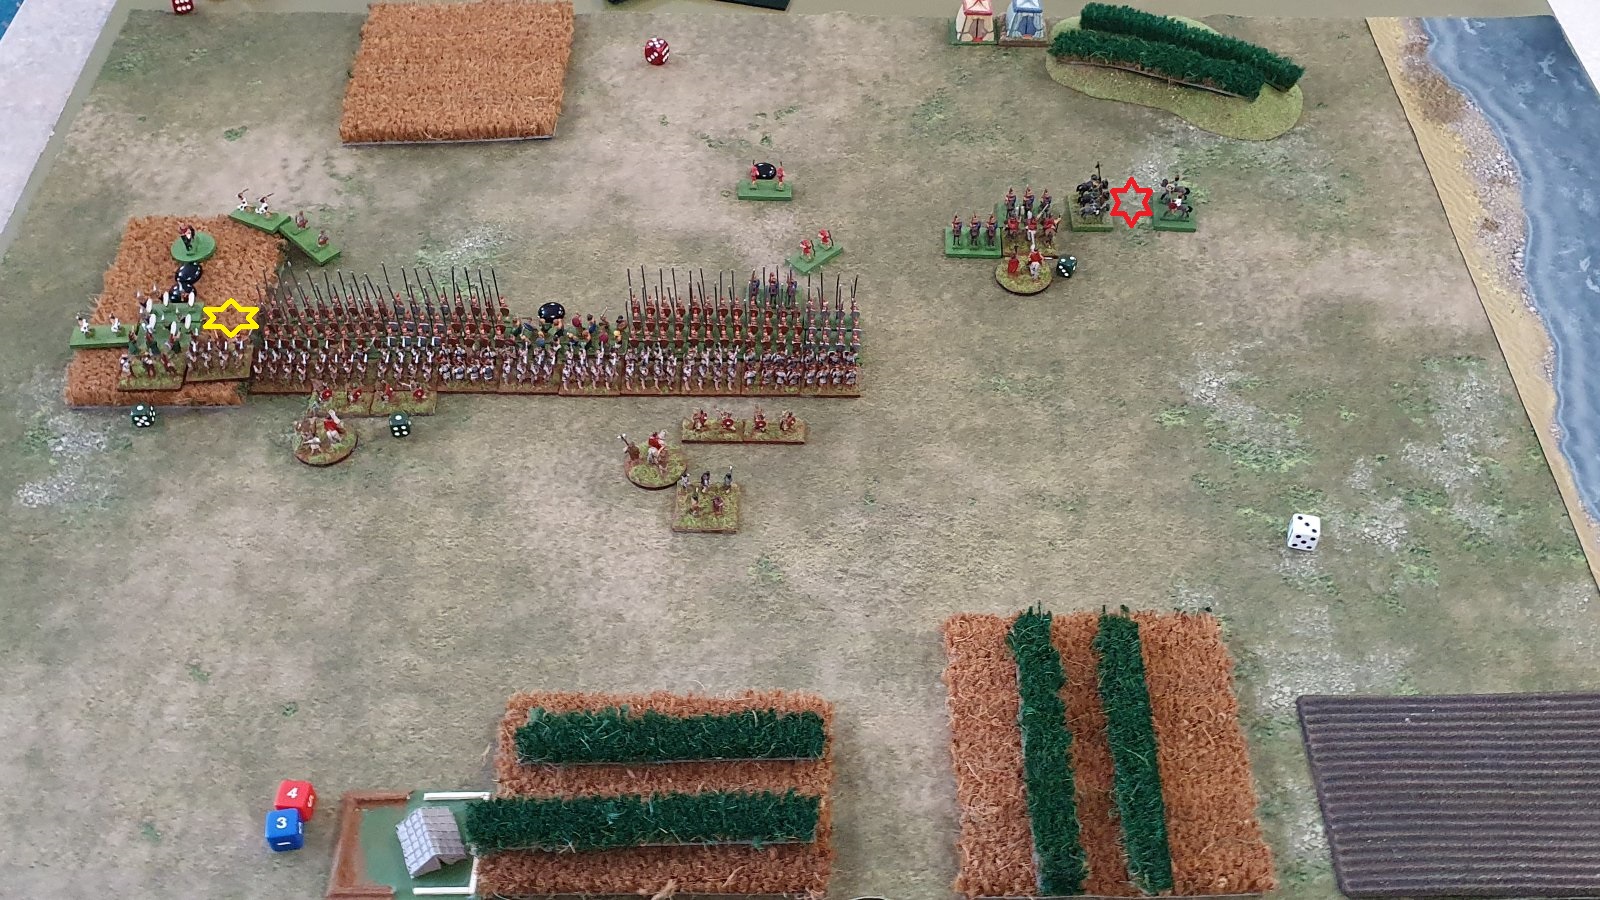
End of Roman Turn Two
In my turn two I moved my battle line forward 2UD. I had a MI and HI in the field (the dice under the stands are to support the models rather than wound counters). My Extraordinarii MI were ZOCing one of the Thracian units, and the other Thracian unit took a hit from my Velites shooting. In the centre my Velites had ZOCed his LI archers and the light foot exchanged fire to no effect.
On the right flank, my heavy cavalry had moved up to within 1 UD of the Seleucid heavy cavalry in order to ZOC them. I have moved up my light horse to be within javelin range of the heavy cavalry, but I didn't score any hits.
Moving up my heavy cavalry within 1UD of the Seleucid heavy cavalry was probably a mistake..

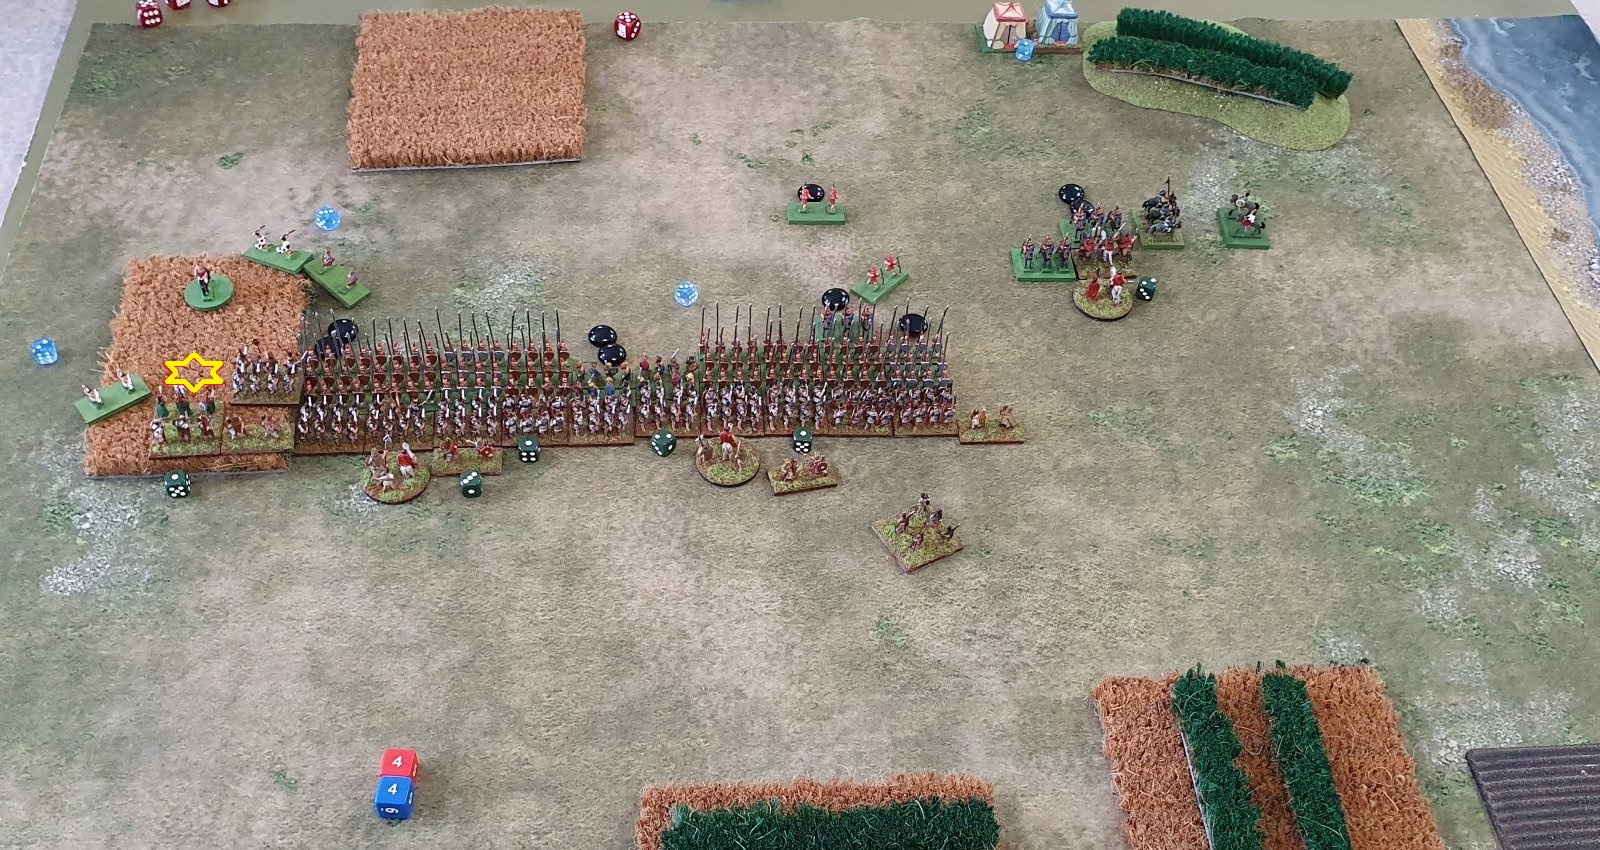
End of Roman Turn Three
I didn't get a picture from Seleucid turn three. The Seleucid infantry central command moved up to align with the right wing battle line. One of the light infantry moved across to support the Thracians in the field. His heavy cavalry charged mine. My right most unit was fighting against an elite unit with included general and my unit was destroyed in the first turn of fighting.
His light horse charged my light horse, the front unit evaded but the rear unit took the charge. The second Scythian light horse moved to support the first unit. In the light horse battle, the Scythian light horse unit was destroyed.
In the Roman turn, the battle line advanced so that the Thracians were engaged. Both groups of Velites charged the opposing skirmishers. The light horse that had previously evaded charged back into the combat to engage the remaining Scythian unit. The light horse that had defeated it's opponent charged the Seleucid Companion cavalry in the flank.
The cavalry battle did not go well, with me losing two heavy cavalry and one
light horse. The light horse that had charged the elite heavy
cavalry with included general lost the battle and took 1 hit.
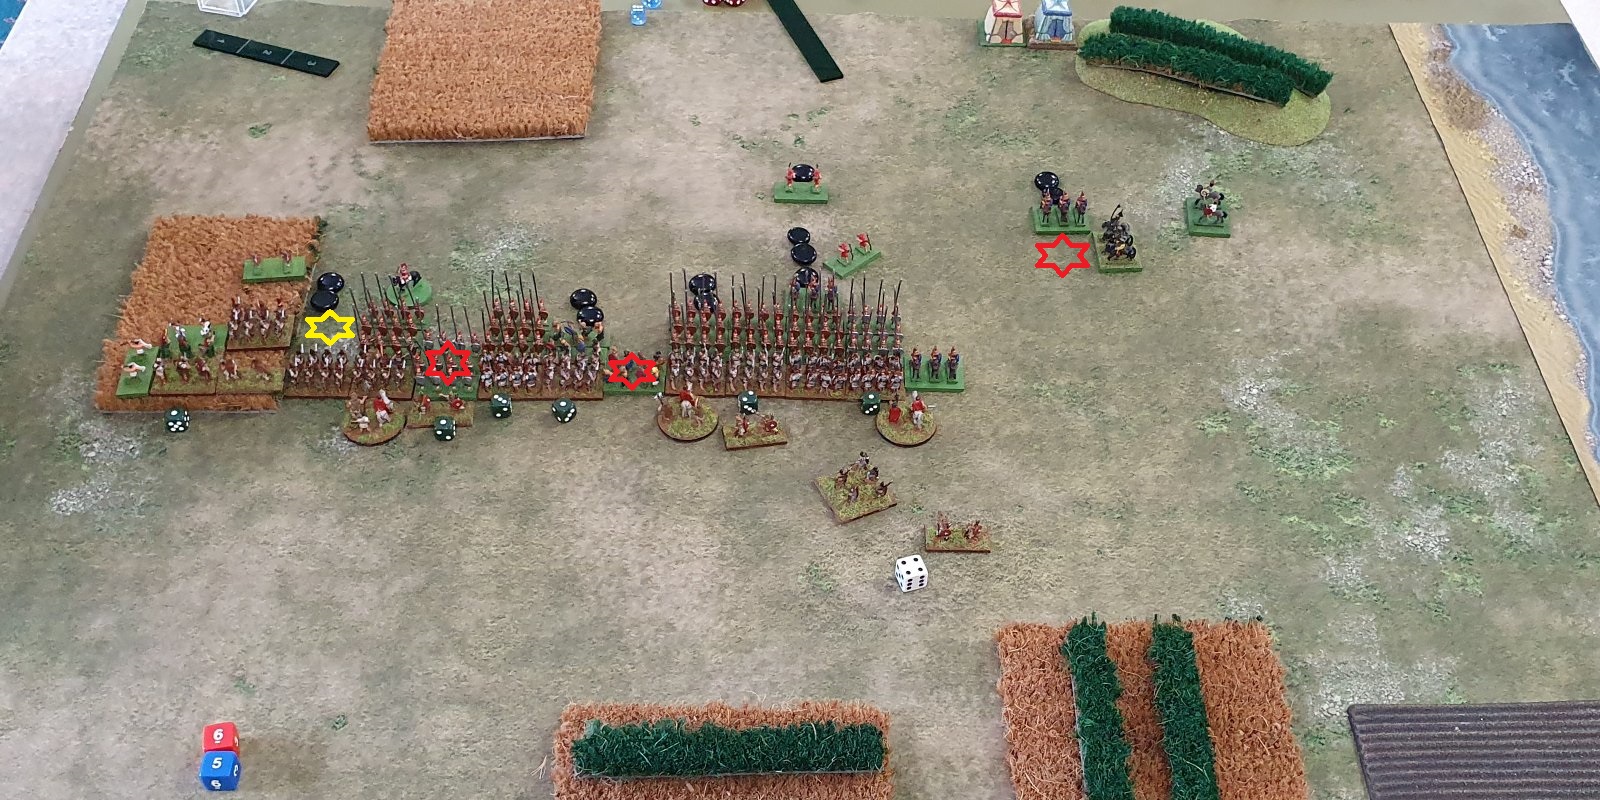
In the Seleucid turn four the main pike battle line moved forward. The Seleucid right wing charged into contact and the centre wing was just short of making contact with the Romans.
The injured Thracian unit was destroyed, leaving a hole in the Seleucid flank. In the main battle line the honours were even with one hit on the legionaries and one hit on the Galations. My remaining light horse unit was destroyed, and my remaining heavy cavalry unit took another hit.
In the Roman turn four, the legionaries in the field who had defeated the Thracians moved up along the flank of the Seleucid pikes. The reinforced unit charged into contact with the Seleucid centre.
The Extraordinarii MI destroyed the remaining Thracian unit. In the battle of the heavy infantry, both sides won 4 combats each. In the cavalry battle the heavy cavalry heroically inflicted two hits on the opposing unit.
It had been a good turn for the Romans. We went to lunch and the Seleucid general was feeling worried about his right flank.
Coming back from lunch we forgot what turn we were up to. I thought that we were starting turn six but it was only turn five.
The Seleucids moved the light foot aggressively. Two units attacked the Extraordinarii MI whilst a third ZOCed my legionaries in the field. On the other flank the supporting Companion HC unit left the cavalry battle to support the infantry battle, with the unengaged Companions coming in to the flank of my remaining HC unit to destroy it.
In the infantry battle the Romans legionaries destroyed one unit of pikes, but further along had a unit of Seleucid pike and swordsmen break through the battle line in two places.
I was able to execute my plan, but I wasn't successful in the infantry battle.
With respect to ignoring the coastal zone, that left me with two open flanks - one of which I was able to anchor in terrain. However I was lucky that Kevan repositioned his cavalry to match mine. If he had moved it down my left flank I would probably have bunkered down and had a boring game.
Rather than engaging in the cavalry battle, I might have been better able to tie them up by fleeing from their charges. However if I wanted to ZOC them, there would be a 1/3 chance that they would catch me if I evaded. Maybe I should have stopped just out of 1 UD, so that they couldn't have moved forward without getting ZOCed but I would have only a 1/9 chance of being caught in a charge. Maybe even better would be ending just out of 2UD. I would have been able to safely evade at least once and maybe twice.
My plan had been to move as far forward as I could with my cavalry so that I would have room to evade. So why did I change plans and not evade? I was concerned that if he did charge forward that he could end up in position to charge my infantry in the flank. However that would have left him open to a flank or rear charge, so in retrospect I doubt that he would have done that. I probably need to practice evading with my cavalry.
Both Kevan and I thought that his cavalry would destroy mine. This was the case, but on paper it looks like it should have been closer. Both commands were 41 points. His heavy cavalry had impact whereas I didn't, but my light horse had javelins and his didn't. What happened was that in two rounds of combat I lost two HC and one LH and killed one LH.
Kevan suggested after the battle that if I wanted to get lots of terrain on the board it might have been better to only place three pieces of terrain plus the compulsory piece, which would allow me to move one piece to a more useful location. Of the five pieces that I placed, only one was in a position where it was used in the battle.
I could also have placed ambush markers to limit the Seleucid ability to do multiple moves in the first turn. This would have made it less likely that the Seleucid cavalry would run down my flank (which they didn't do) but would also have delayed the battle with the Thracians (which worked out in my favour).
In terms of making use of terrain, Kevan had both his MI in the one command whilst I spread mine. My thought process is that both commands might have an element in terrain, but that wasn't the case. By concentrating his MI in one command Kevan was able to use them together with the idea of controlling the terrain. I had to use one MI and one HI to face off against them.
A pivotal manoeuvre by Kevan was using his light infantry to ZOC my HI in terrain, which otherwise would have charged his Pikemen in the flank. If I had MI rather than HI it still would have been ZOCed, but Kevan's move did show how useful LI could be in terrain. I should have considered having my light infantry in the terrain as a supporting unit.
Once the main battle lines met, my light infantry were just behind my heavy infantry and I didn't spend any command pips to move them out the way. This meant that when by heavy infantry broke, not only did the light infantry take a hit for being within 1UD behind them but also Kevan's pursuit should have hit them and destroyed them (we played it incorrectly and had them evade). It took three rounds of combat for units to be taken off, so I had at least one turn to move the light infantry.
Given that we had the same number of points invested in the two infantry commands, but pikes are more expensive than legionaries, why didn't I have overlaps? Part of the reason is that elite legionaries cost the same as pike, and part is that I did have an extra unit (the Javelinmen) that I didn't use effectively. I should have had it up supporting my battle line much earlier. If I was worried about the cavalry charging it I could have evaded.
I felt that I used the light infantry effectively before the two battle lines met, but not once they met. I should have made sure that they were out of the 1UD "danger zone". Maybe I should have got the LI into the terrain earlier to provide an overlap. When I moved up the LI on my right flank, given that I couldn't get into a supporting position straight away maybe have positioned it so that Kevan would have to choose between charging it with his cavalry or moving the cavalry to get into a supporting position on the infantry battle.
With respect to command pips I felt that I had enough pips until the battle was engaged, but I didn't have enough to manoeuvre my LI units after the battle was engaged. Perhaps I should have made it a priority rather than rallying.
In terms of changes I would make to my army list, one option would be to replace the extra Triarii in the reinforced legion with a legionary, and use the points to make the Javelinmen an armoured elite medium swordsmen. There is also the question of the cavalry command. Should I get rid of all the cavalry and have a rough terrain command, or perhaps use some of the points for generals and armour upgrades, or maybe just get more legionaries?
Kevan's cavalry command was pretty light, so most opponents would have had a larger command and won the cavalry battle more quickly. If I didn't have any cavalry to face off against his, how would he have used his cavalry against me? Julian's guide to ADLG suggests having one MC/HC per foot command to provide a reserve.
Redeploying my impact cavalry to your right was the better option for me.
If I went down your left flank I would have had a chance into your rear, however
your cavalry would have had the same option with my pike who are less
manoeuvrable than your legionaries. Your cavalry was always going to
struggle, especially when you deployed them in front of terrain.
Looking at the board again it was to your advantage to fight my cavalry where
you did. I wasn’t behind your rear when I would eventually beat you and still
had a couple of moves to get the rest of the cavalry behind your army.
Where you lost the game was in the centre with the first bound of contact. First
bound we start even and although wins are good for me, draws are the next best
option as I would be one up next bound. I think I only lost one out of the ten
combats to set up for the win, as all it took was one bound of bad rolls for you
to collapse.
Your left was causing me problems as I was losing every combat and that was were
the majority of my loses were from. I think I only won one to cause a hit on one
of your mediums out of the five rounds. Lost both Thracians, a pike unit and a
LI unit!
When choosing terrain and with an infantry army I would always roll for the
Waterway. If defender you get the compulsory piece on a flank or centre then the
waterway and your flanks are covered.
Regarding your army list I like the idea of having a terrain occupying command
with the elephant for some punch.
I suggest this from the Madaxeman WIKI. I like the look of the a terrain holding
command with an elephant and by placing the Gauls in ambush you can control when
they can commit.
53 Rep Roman (Steer - Britcon 2019)
Competent
4 Hastati- Principes Heavy swordsmen impact ------
1 Velites Light infantry javelin ------
1 Triarii Heavy spearmen armour Elite
1 Roman Horsemen Heavy cavalry ------
1 Velites Light infantry javelin Elite
==
Competent
4 Hastati- Principes Heavy swordsmen impact ------
2 Velites Light infantry javelin ------
1 Triarii Heavy spearmen armour Elite
1 Roman Horsemen Heavy cavalry ------
==
Strategist
1 Cretan archer Light infantry bow Elite
2 Italian Allies Extraordinarii Medium swordsmen Elite
2 gallic warriors Medium swordsmen impetuous ------
1 Elephant Elephant Mediocre