I was going to be playing David who was new to our club, and all I knew was that he would be bringing a Classical army.
I had been painting my Numidian allies, and I could field them with either Carthaginians or Republican Romans. However I am still trying to work out how to make mediocre elephants work so decided to go with the Carthaginians.
My thinking was that one mediocre elephant with impact against ordinary heavy infantry will win 50% (18/36) of the time in the turn it charges, so a single elephant is pretty random. With two mediocre elephants, you'd expect one to win. With three mediocre elephants you'd expect one to win, one to lose, and the third to either draw or win. I thus thought I'd run a block of three elephants.
With an elephant command and Numidian allies, my third command almost picked itself as a group of six heavy infantry. I decided to have 4 impetuous Gallic infantry with two units of HI spears. I also added two medium cavalry and two light horse, to be able to either protect a flank or support another command.
When we revealed what armies we were playing, I found that I was up against Carthaginians.
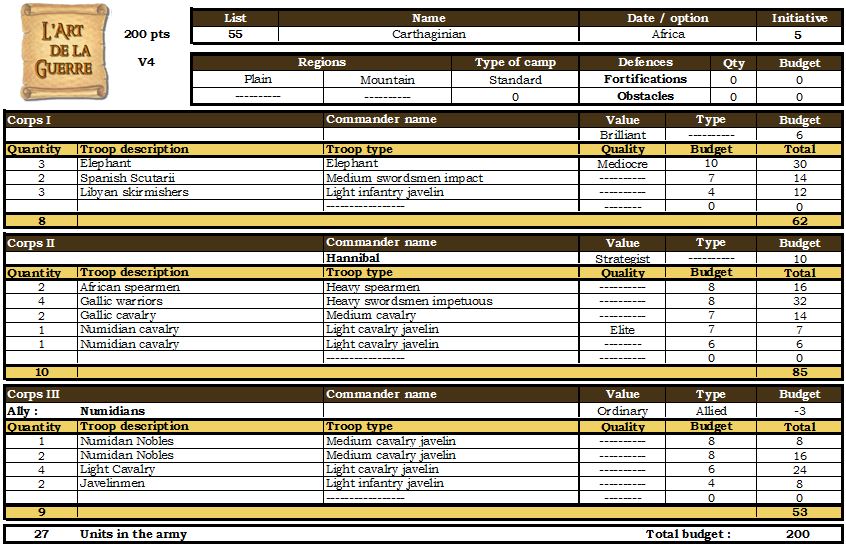
My Carthaginian list. I used Africa option rather than Spain so I would have access to the Gallic infantry.
David's list.

I won initiative and attacked in the plains.
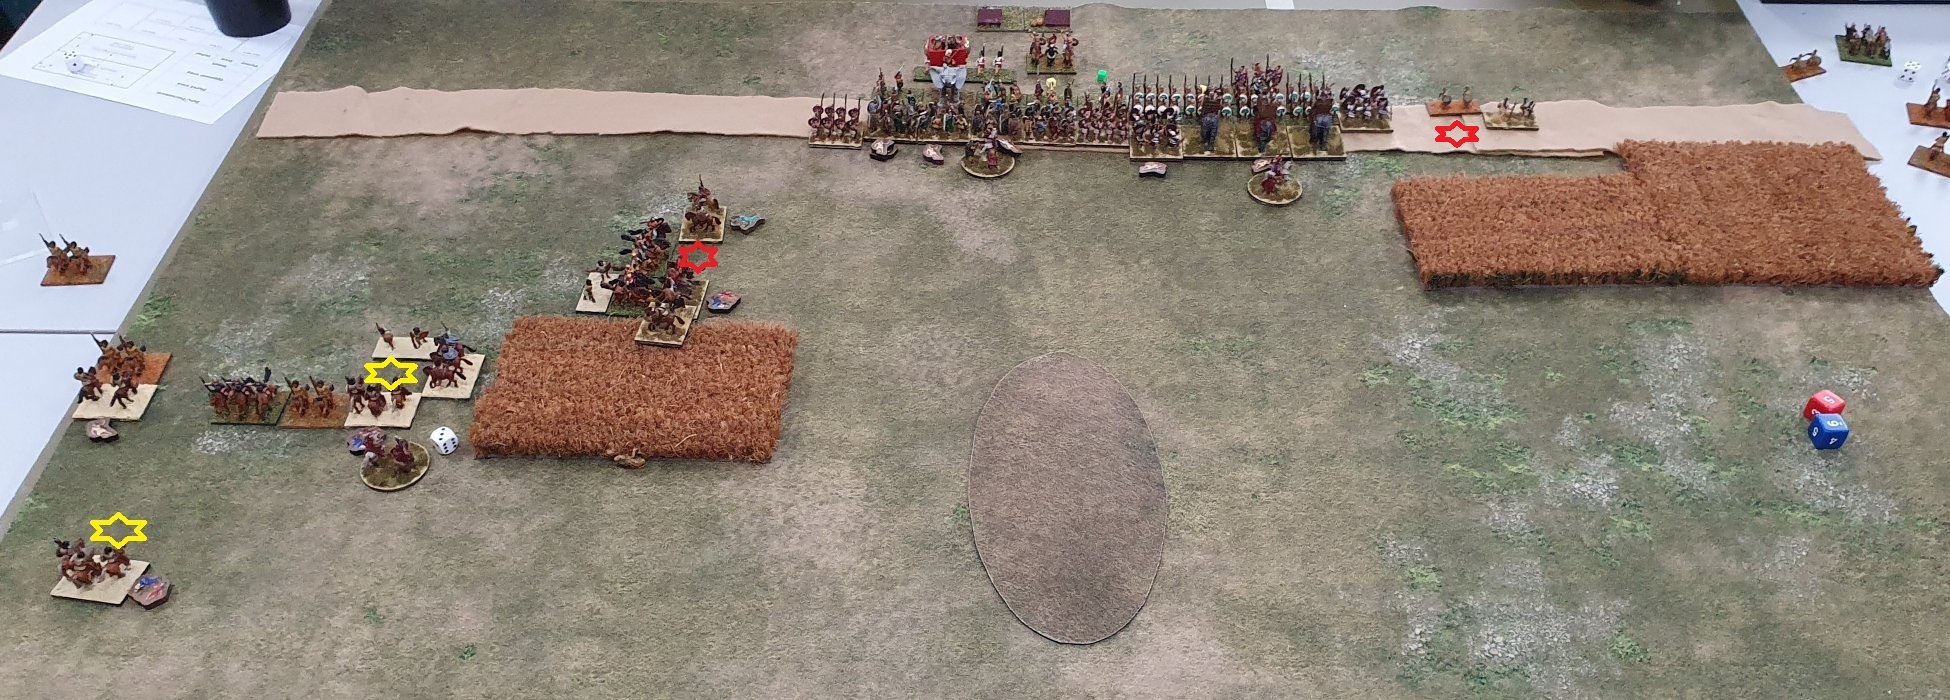
David took the compulsory field, a road and a gentle hill. I took two fields, as being ideal terrain for my elephants. We both adjusted the terrain which lead to two fields adjacent to each other on my right flank.
With the fields where they were I decided to have my elephants on my right flank, with the cavalry from the Corps II positioned to support them. I had the Numidian allies on the left flank with the light forces well forward in case the allies were hesitant.
David started with two ambush markers in the fields, but revealed the ambush straight away as light infantry.
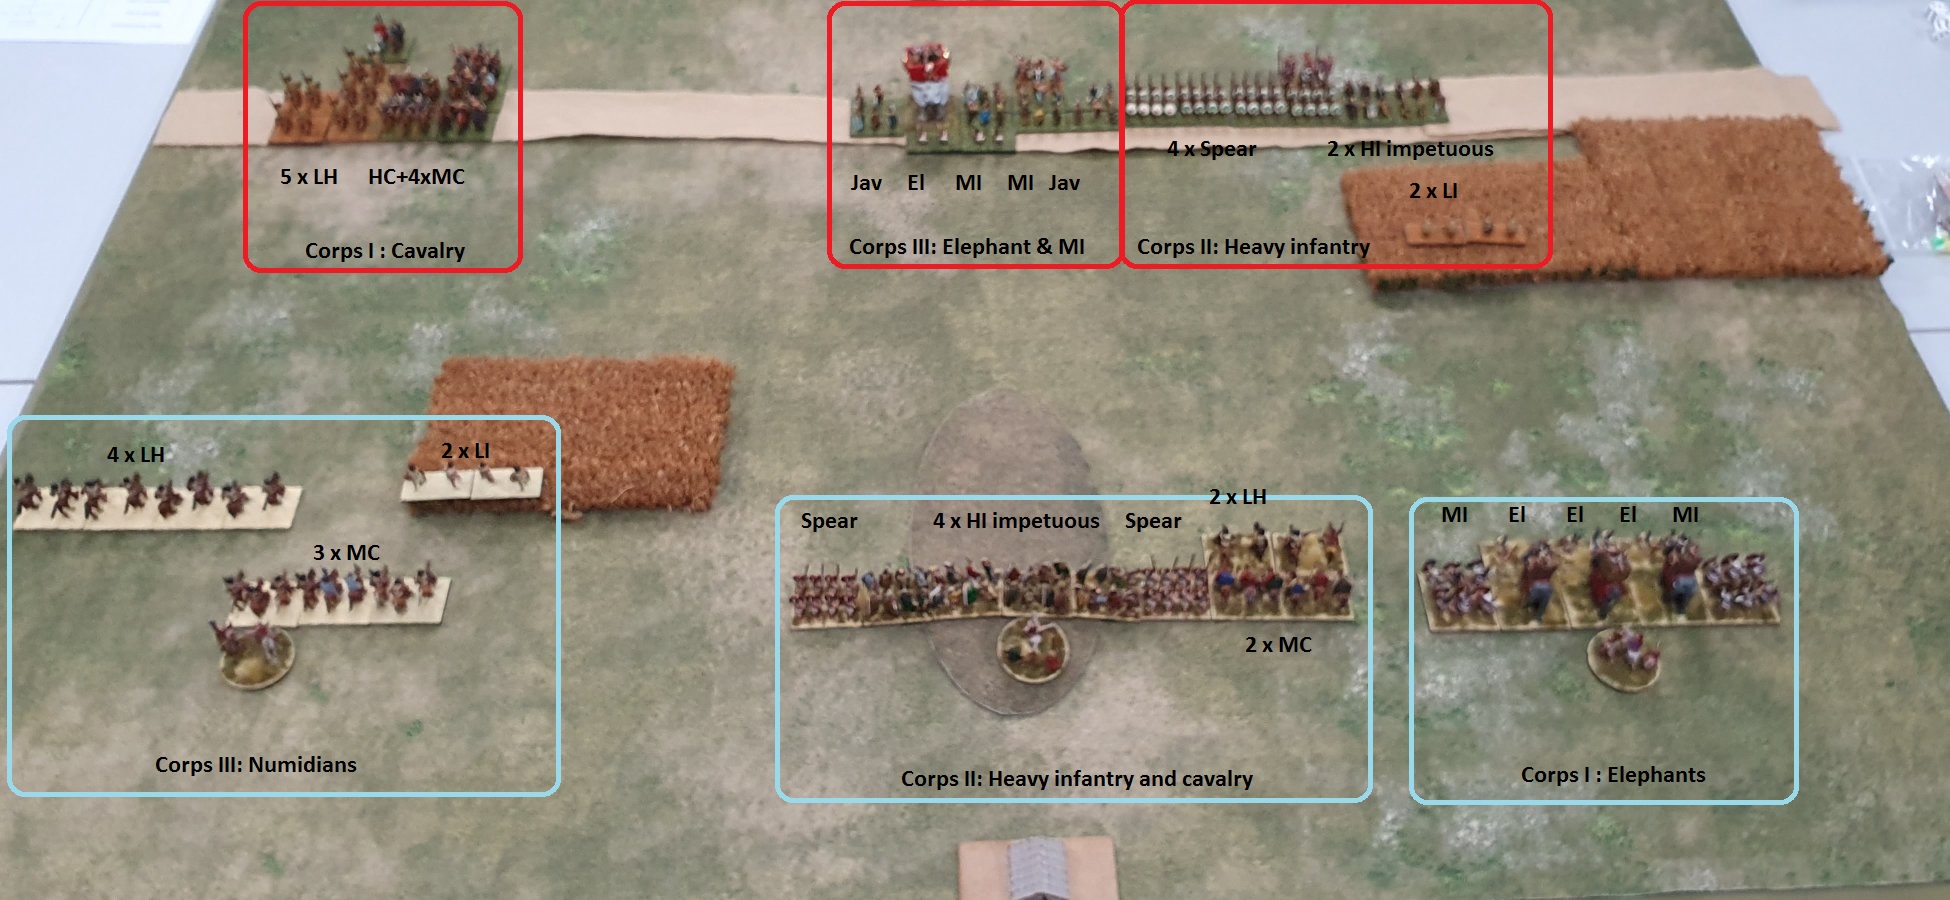
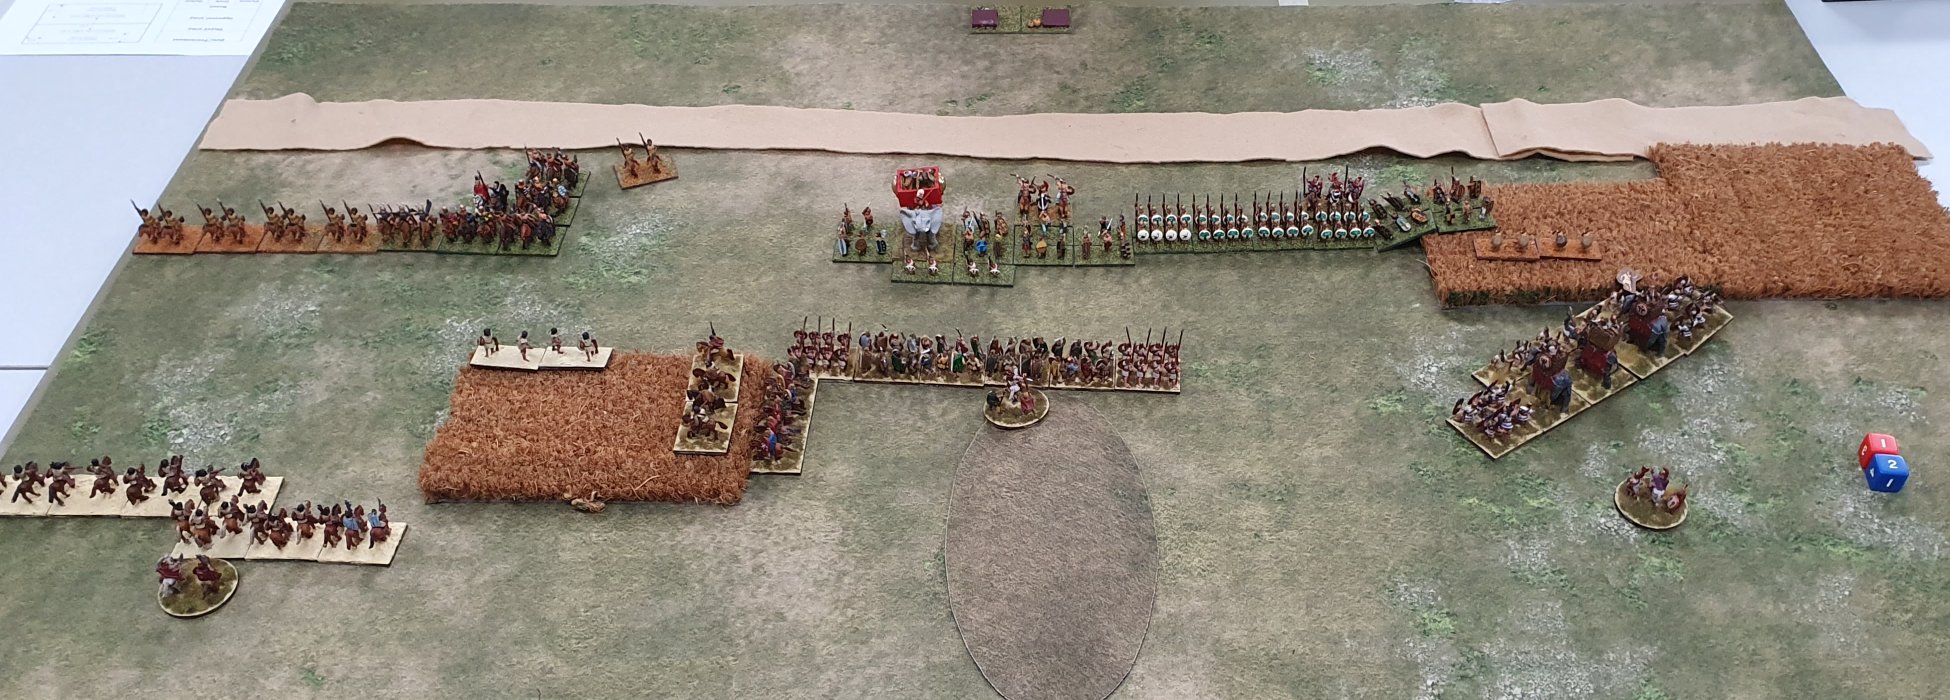
Initial deployment
My Numidian cavalry was outmatched by their opponents, I had 4 x LH and 3 x MC against 5 x LH and 4 x MC + 1 x HC. In its favour, I had the terrain to limit the frontage of the fight and a couple of LI to threaten flanks.
The cavalry in my central corps needed to reposition. They could either head left to support the Numidians or exploit a gap in the enemy lines, or could have gone to the right to go through the fields to try and flank the enemy line. I already was overlapping on the right, so sending the cavalry to the left looked like the way to go.
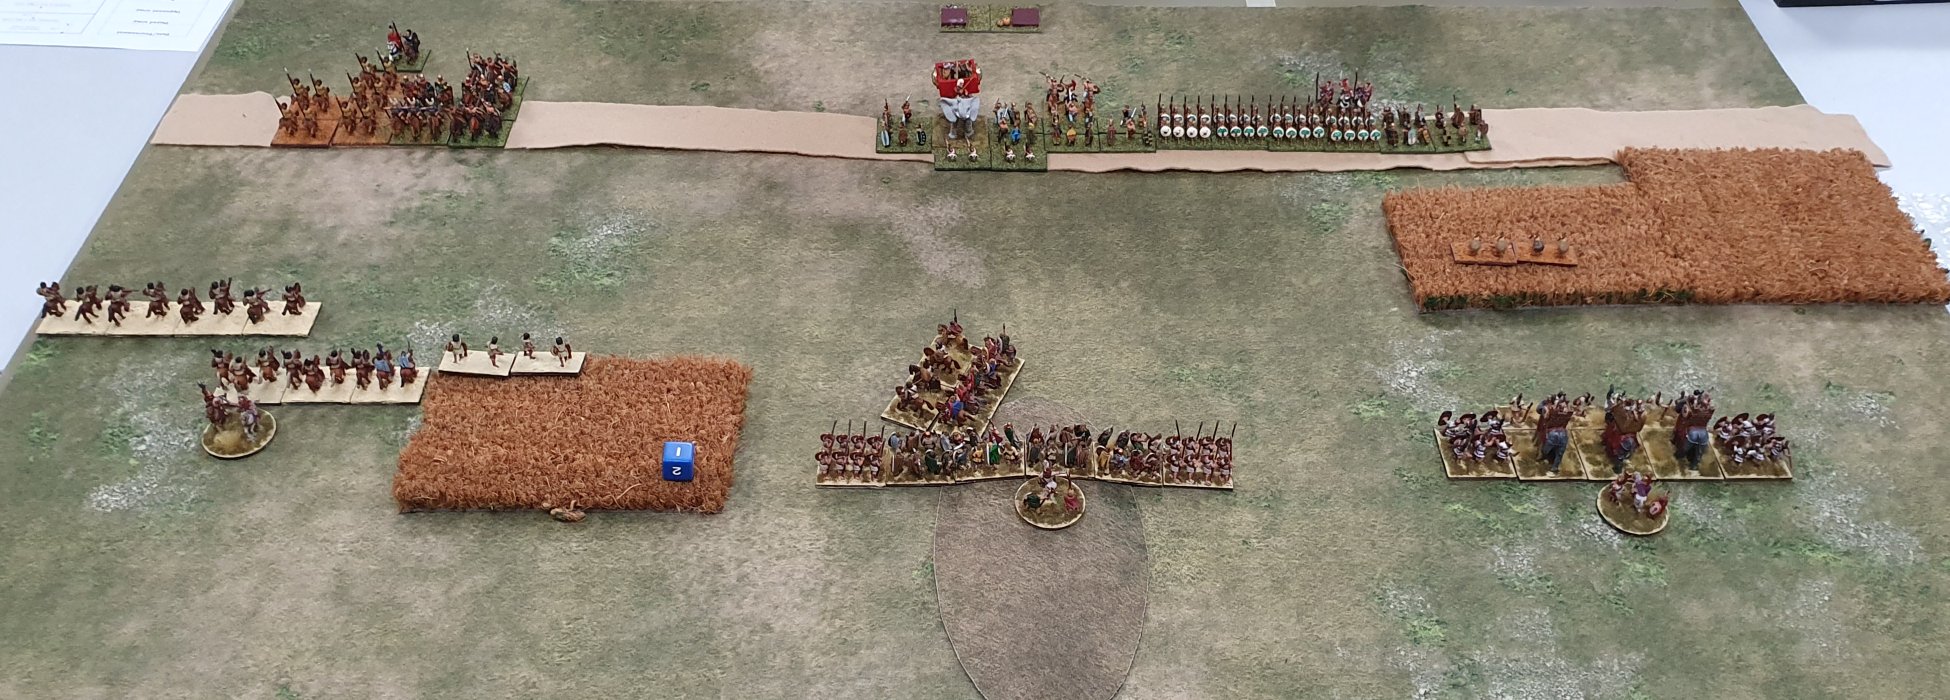
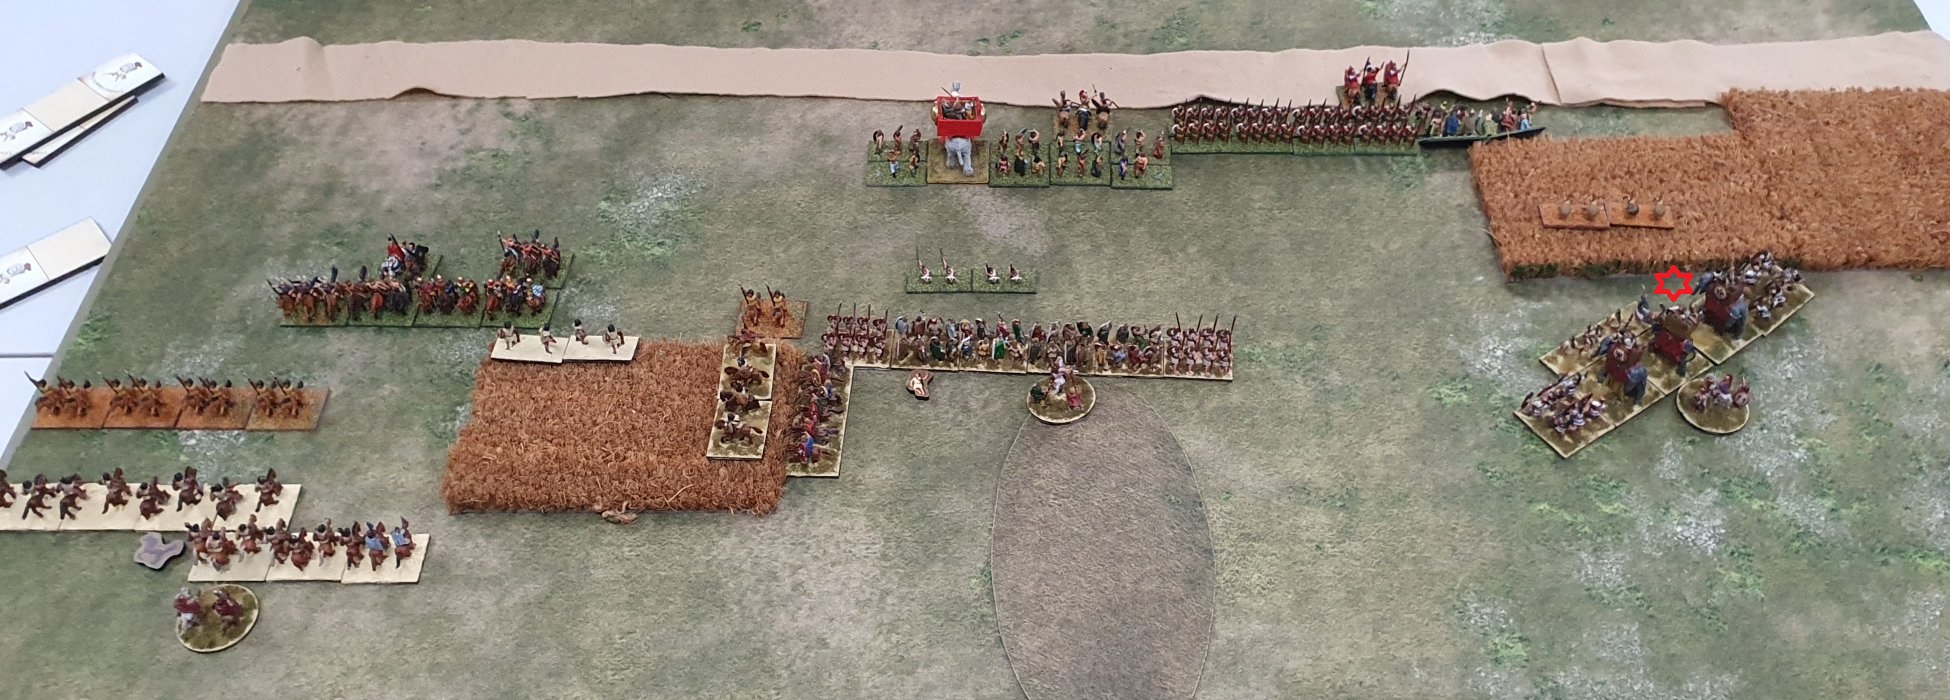
End of Attacker's Turn One
In my first turn I moved everything up, with the cavalry in the centre corps moving across the front of the infantry to get into a supporting position. In retrospect I may have been better off with the Numidians of having a line of 3 x LH and 3 x MC with one LH held back in reserve.
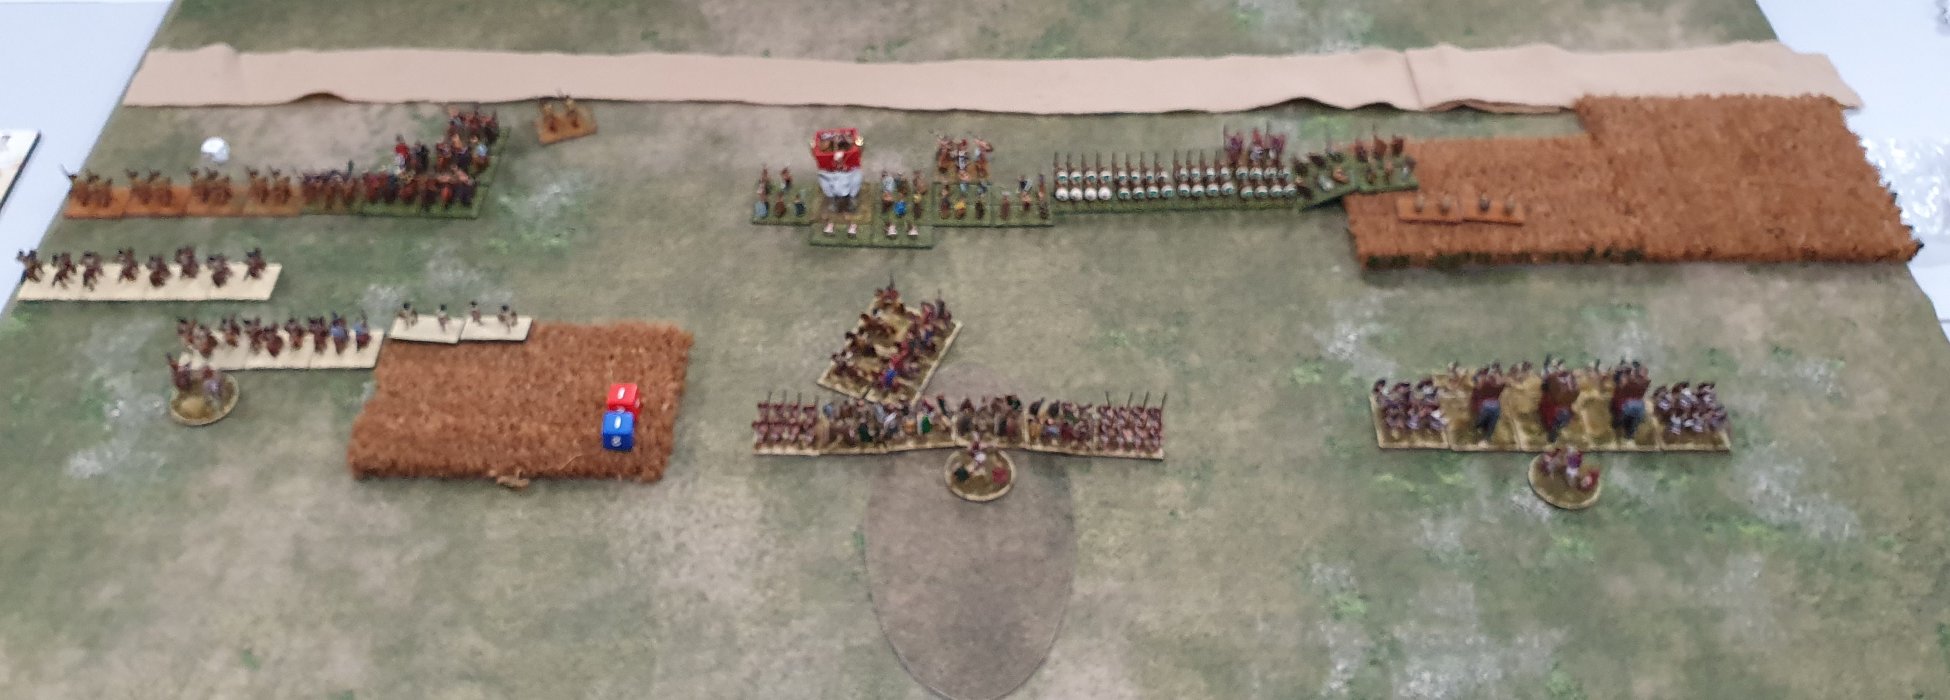
End of Defender's Turn One
David moved his army forward. On his right flank he expanded his light horse, but sent one unit off towards the centre to protect the gap.
In my turn two I pulled back my Numidian cavalry. I had enough command pips to perform a second move with the medium cavalry so they were facing the enemy again. The cavalry from the central corps moved up to the field as it protected against a flank charge. The infantry moved up and slid left to help cover the cavalry flank.
The elephant command wheeled to try to better support my central corps. One of the screening light infantry took a hit from shooting.
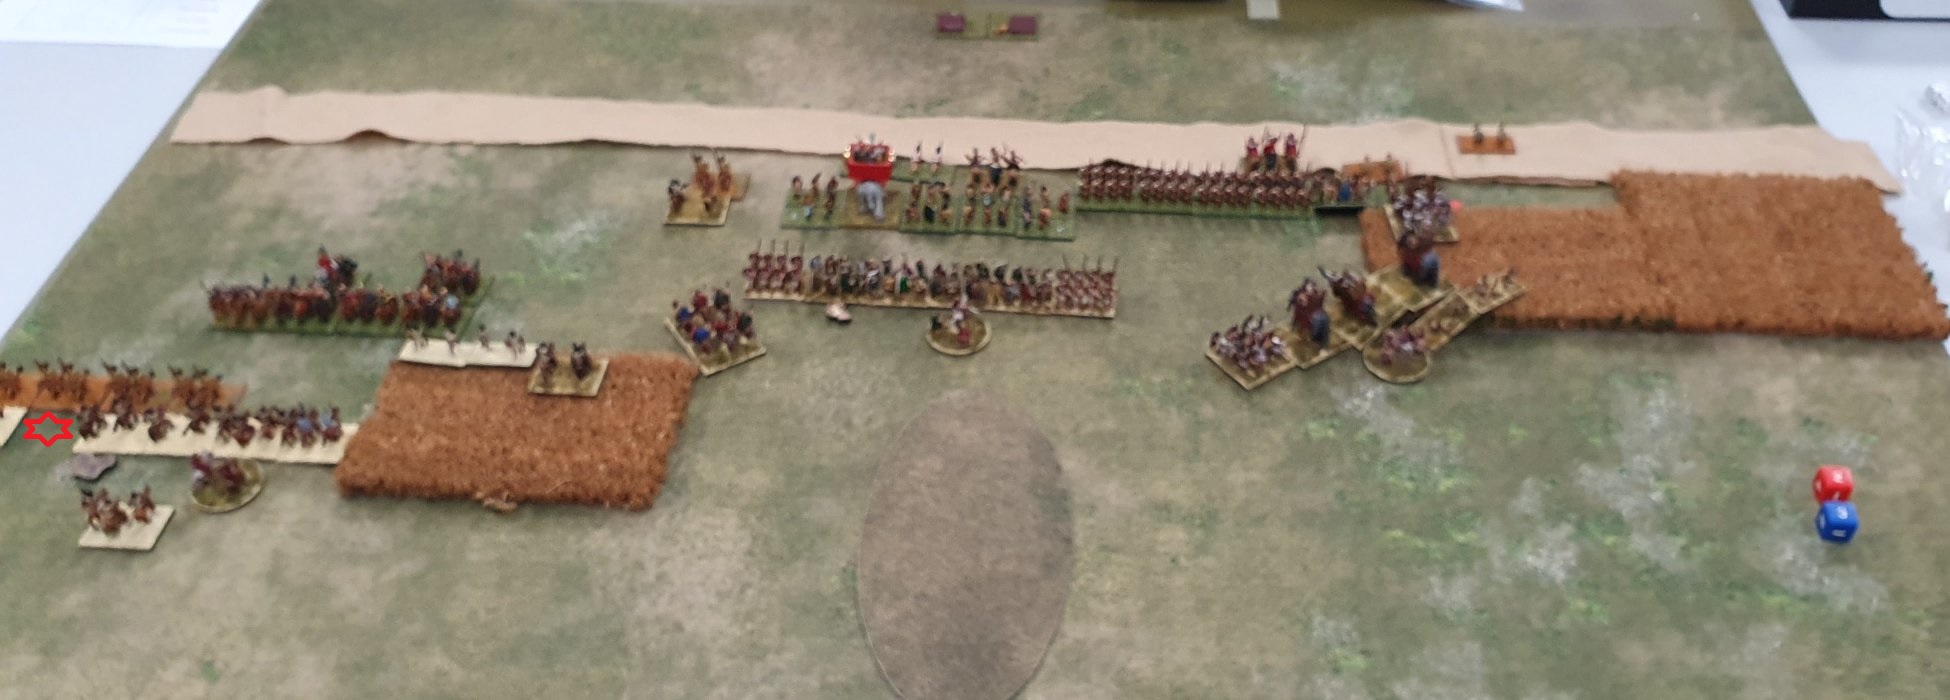
End of Defender's Turn Two
David's light horse moved up and inflicted a shooting hit on my light horse. His medium cavalry moved to near the edge of the field and the lone light horse moved up to threaten the flank of my light horse.
With his heavy infantry in the field on the left flank, he about faced and moved them back to try and exit the terrain. They didn't have quite enough movement and their rear was in the terrain still. Not just the swordsmen, but also the spearmen in the command also retreated back. The elephant command in the centre then also about faced as well, though his skirmishers did push forward.
David did well in the shooting phase inflicting a hit on my light horse, a hit on Gallic heavy infantry, and killing the screening LI in front of my right most elephant.
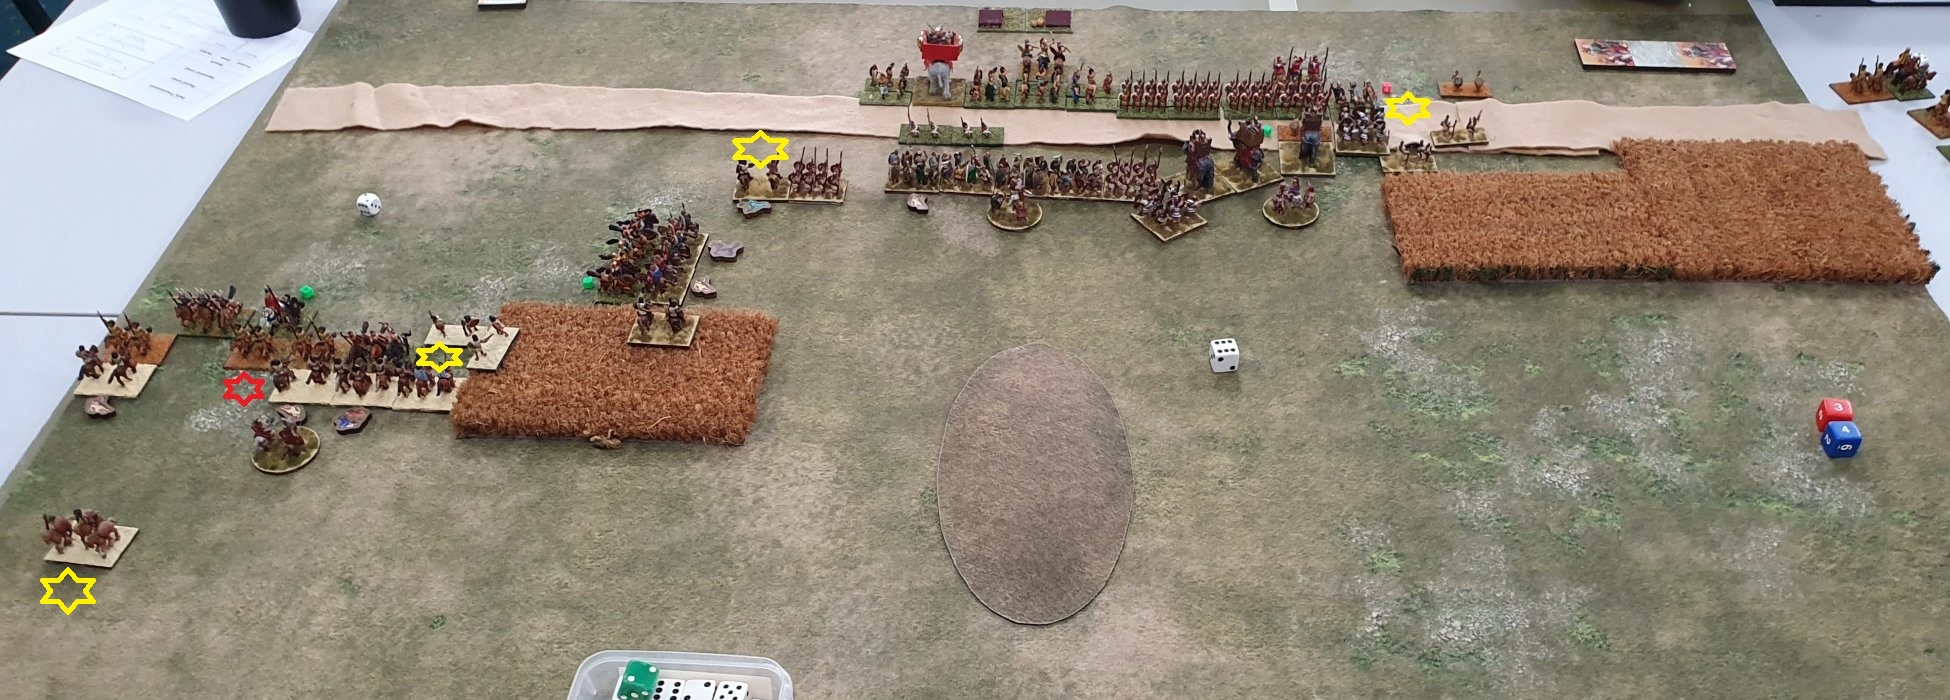
End of Attacker's Turn Three
I really wanted to deal with the enemy light horse just out of the field by moving my light infantry behind them before charging. Unfortunately I didn't have enough command pips to do that. With my Numidians I charged my light horse to engage his, and moved up two medium cavalry to support. The combat didn't go well and I lost one light horse without inflicting any hits on his light horse.
In the centre my light horse charged his, which evaded. He rolled short and I rolled long and caught him in the rear. Unfortunately light units catching evaders in the rear do not result in an impact hit. My central infantry charged his skirmishers, which then left room for my medium cavalry to come out.
On my right flank the medium swordsmen impact charged the enemy light foot, which evaded. However I rolled long for the charge and caught the enemy HI in the rear, in the terrain. In the resulting combat I was factor +3 vs factor -1, and was able to do 3 hits.
In his turn three (no photo), David continued to pull back his infantry as he was looking to refuse combat until his cavalry could win their fight. He moved two units of medium cavalry towards the centre of the battlefield and moved the rest of his cavalry up into the melee. One of the medium cavalry that he moved towards the centre took a hit from shooting.
The light horse that had defeated its opposing number in my turn, moved through the gap to behind my lines.
On his left flank he moved his two units of light infantry up to engage in shooting, one to face my elephant and the other to face my light infantry.
In my turn four the Numidian MC that had hung back from the combat, turned and charged the enemy light horse that had burst through. David didn't want to evade as that would take it off the board. My MC was able to attack it in the rear and route it. I didn't pursue as I was out of range of the enemy MC, though in retrospect maybe I should have because I ended up charged by LH the following turn.
I was able to use my light infantry in the field to attack the flank and rear of an enemy MC in battle with my MC, and the unit was routed. However I did lose another light horse in the battle.
In the centre my MC charged his. I didn't have enough command pips to move my my light horse in the field to support. I chose instead to move my spearmen up to support the other light horse that had charged out of the field the previous turn, and was able to finish off the unit. The main infantry line also moved up.
On the right flank my medium swordsmen impact was able to get the rear of another unit of enemy HI. The rest of the group charged the light infantry, which evaded but was caught in the rear.

David stopped his withdrawal and he turned his infantry to face me. However I was able to take out the HI and LI units that I had caught in the rear in the previous turn.
In the cavalry battle his light horse with general attached charged into the rear of my medium cavalry, inflicting two hits. He also took out another unit of light horse.

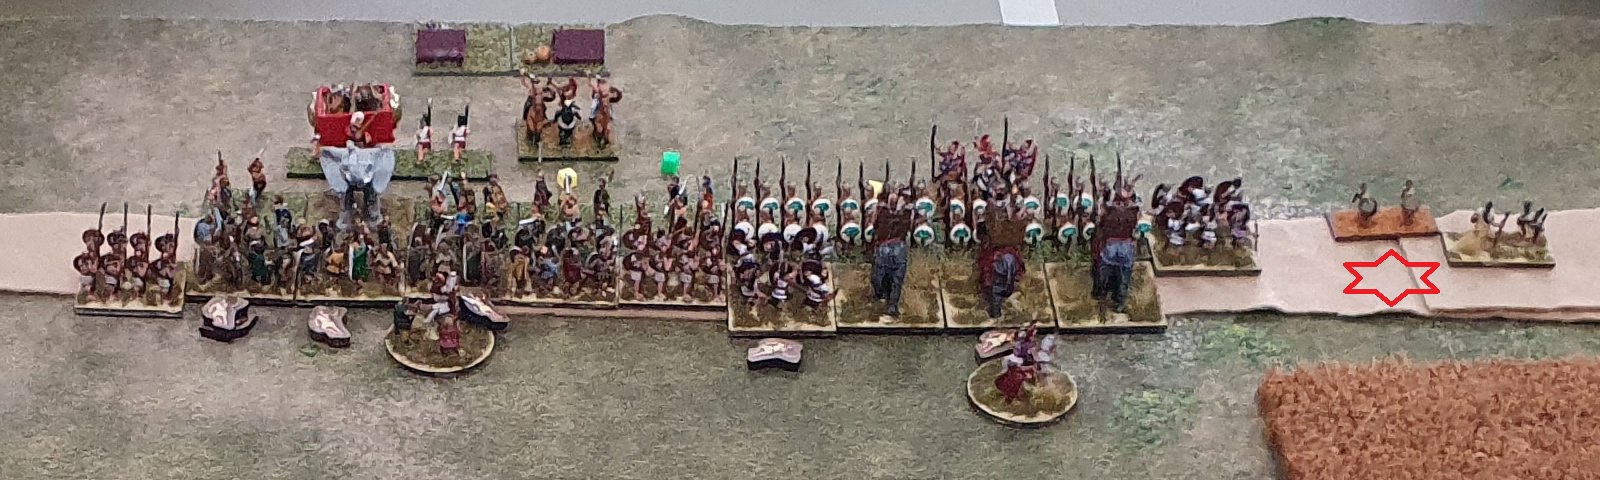
In the centre, the heavy infantry has slid left and charged David's battle
line. I also moved up the HI spear that had been supporting the light horse.
However it
was about 5mm short of being able to support the end of the battle line.
My elephant command then had room to charge David's HI spear, with my
right most Spanish MI being able to move into a support position on the flank of
the spearmen. So how did the three elephants do? I won one matchup,
lost one matchup and drew one matchup.
A most enjoyable game, with both of us manoeuvring our armies rather than just standing still or charging straight in.
David's plan during the game was that he was stronger on his right flank and that he was to refuse his infantry until he could overwhelm my left flank. However I pulled back my Numidian cavalry to have its flank secured by the field. I also reinforced my left flank by moving my Gallic cavalry and supporting light horse across the front of my infantry, and I had the potential to either reinforce my flank or to move out to a position to threaten the flank of his infantry. David countered this with first a unit of light horse and then two of medium cavalry, which pulled my units into the cavalry battle on the flank.
That meant the final tally of units on that flank was David with 5 light horse, 4 Spanish medium cavalry and 1 heavy cavalry vs my 6 light horse, 5 medium cavalry and 2 light infantry. It could have gone either way.
The final result on my left flank was that David still had uninjured 4 units of mounted, plus one disrupted unit. I had 2 uninjured units of mounted, plus 4 mounted units with just 1 wound left. It was a close run thing.
In the infantry battle, my eye's lit up when David's battle line about faced and withdrew. When he finally stood and faced me, I charged in straight away. Should I have waitied a turn until I could move up the spearmen on the left and the medium infantry on the right? However there would then be the risk of his medium cavalry attacking the rear of my battle line.
Overall I don't feel that I made any major mistakes. I should have managed my cavalry on the left slightly differently so as to have 3 LH and 3 MC in combat rather than 4 LH and 2 MC. I lost 4 army cohesion points at the end of the game when two light infantry charged one light infantry, and I lost both my units over two player turns. If I hadn't charged in I would have won the game, but given the same situation would probably do it again.
Ironically, given that I purchased the Numidian models so I could use MC javelin shooting, my Numidian Nobles didn't do any shooting.
I was a little careless in a few movements. As mentioned above, if I had charged only 3 LH I would have had room to charge the 3 MC. Also when I moved up the HI Spear to support my LH in combat if I had moved up to be in side to side against the enemy unit I would have had the option of either next turn moving into combat support or at the end of the combat moving up to provide simple support to my infantry battle line (it was about 5 mm short of being able to provide support).
With respect to my army composition, the mediocre elephants charge against infantry performed as expected: 1 win, 1 loss, 1 draw. If I had positioned the elephant corps on my left flank they may have been a terror weapon against the enemy cavalry, but my cavalry would have been ineffective on my right flank against his spearmen. Also I maxed out my army initiative to ensure favourable terrain to support the elephants. Three elephants plus their screening light infantry would save 42 points - which would get me 5 heavy infantry or 6 or 7 medium infantry or extra cavalry.
In terms of rules we got wrong, I don't think we played Commanders in Combat (p28) and Lost Commander (p26) correctly. An engaged commander must spend one more CP for each order given, except to rally the unit in which he is attached (p27). Once the commander was lost each unit is considered out of command range and so it costs an extra CP for each order. This wouldn't have changed the result of the game as the last order issued (LH charged my MC which evaded) didn't achieve anything.
Kevan was a casual observer on the day, but after reading the above battle report offered the following comments.